Chronically Beautiful!
  • Home
  • Chronically Beautiful Blogs
    • Chronically Beautiful
    • Chronically Delicious
    • Chronically Healthy
  • About
  • The Chronically Care Project
    • Adult Care Package Application
    • Kids Care Package Application
  • Published Articles & Podcasts
  • Contact
  • Disclaimer

Chronically Delicious!

Picture

Blackberry Pie Bites!

11/14/2018

1 Comment

 
Picture
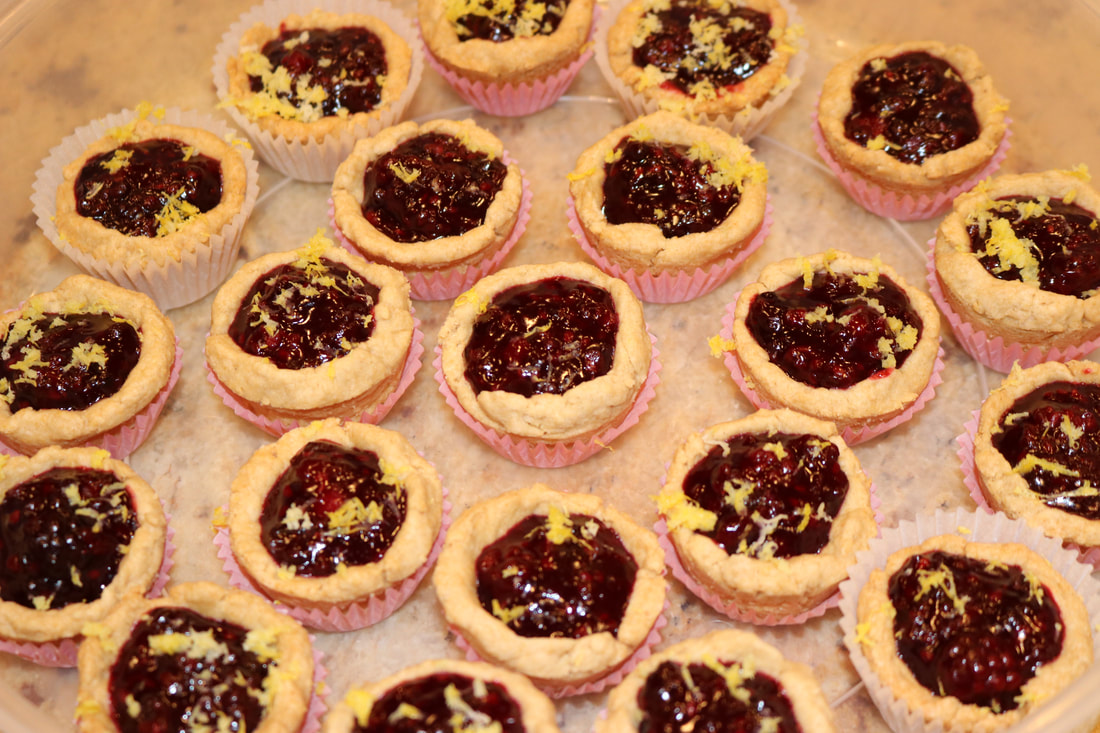
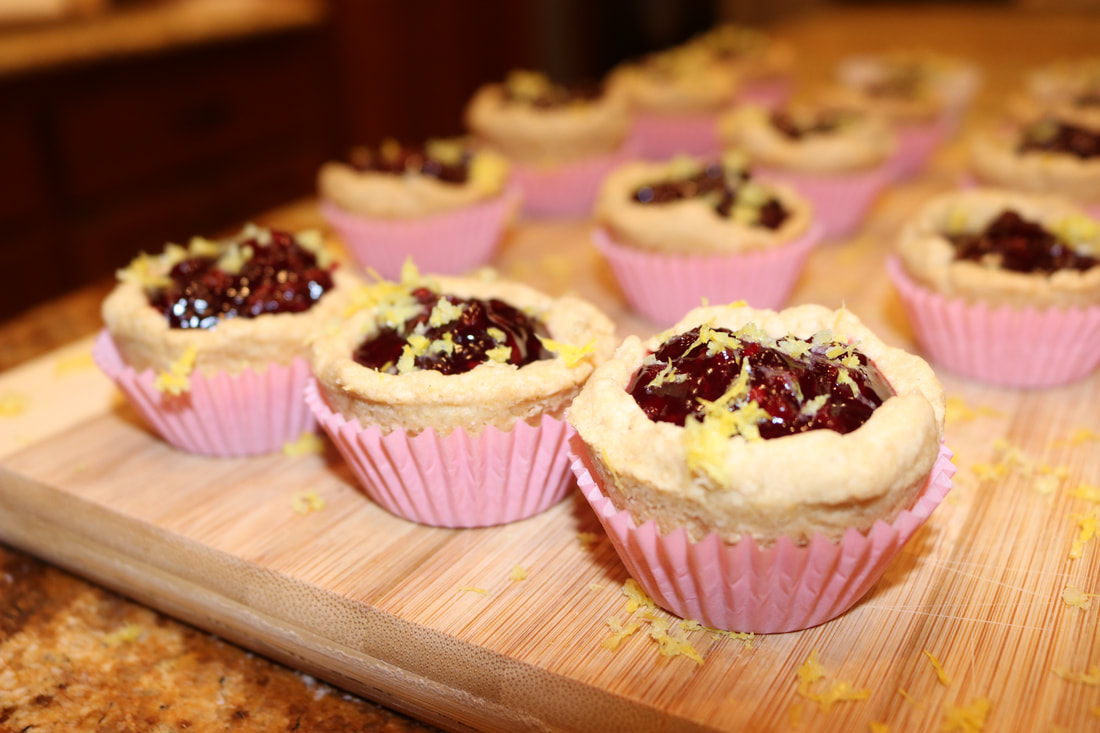
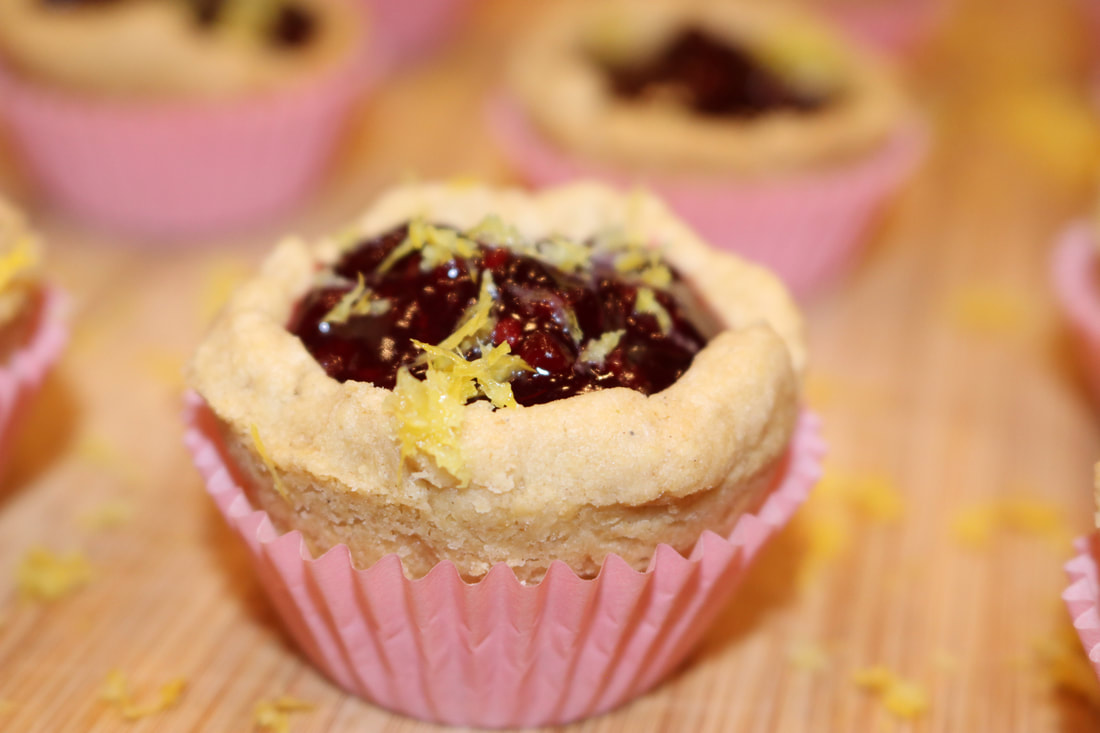
Our first thanksgiving recipe is now up on the blog! Tis' the season for sweet pastries and pie (even in bite size form)!  My mom has always made THE BEST pie crust in history, and I think we have officially converted it to match our healthy Lyme lifestyle.  This recipe is made with whole wheat pastry flour and palm shortening instead of white flour and Crisco to eliminate any harmful additives.  It's also made with DELICIOUS organic berries that can be converted into any berry you like, and it's perfect for all of your holiday parties because they're so simple and bite-sized! 

Blackberry Pie Bites
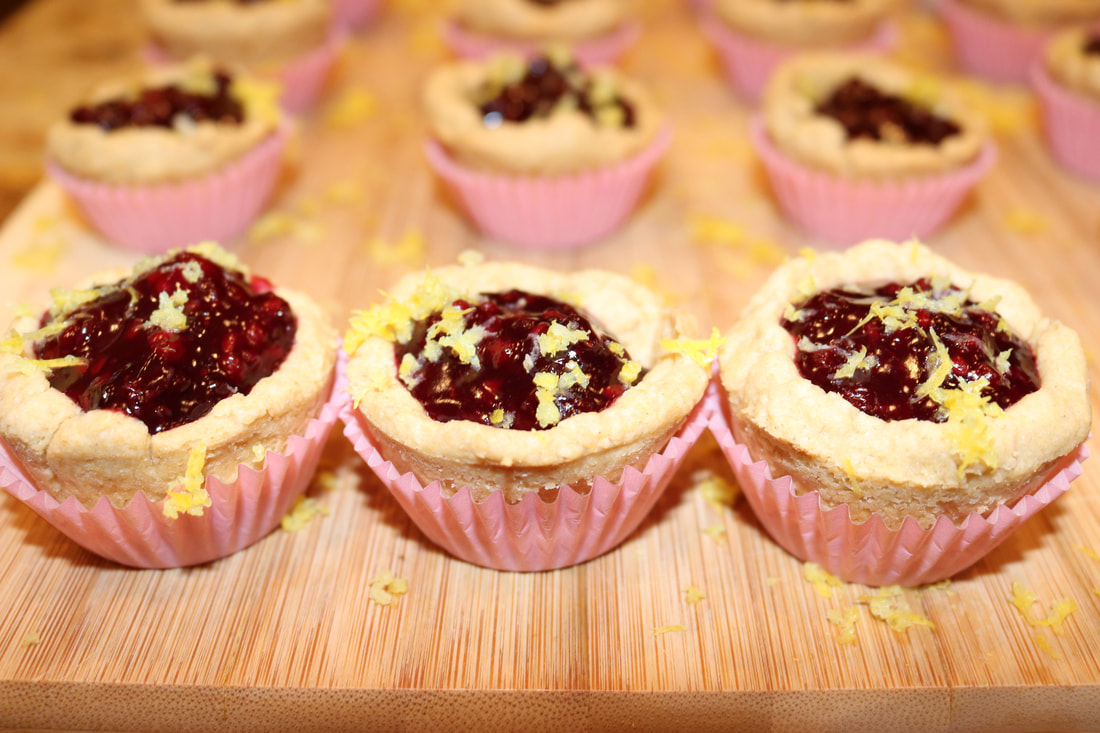
Picture
Ingredients:

Crust:
2 cups whole wheat pastry flour
1/3 heaping cup palm shortening
1/3 cup butter (cold)
1 tsp. salt
4 Tbs. cold water

Filling:
4 cups frozen blackberries
1/3 cup raw honey
2 tsp. vanilla extract
2 tsp. cinnamon
1/2 tsp. nutmeg
a pinch of clove (optional)
2 Tbs. Cornstarch (Non-GMO)
4 Tbs. cold water

Directions:
  1. Preheat oven to 350°
  2. Combine flour and salt in a medium bowl and mix with a spoon.  Add shortening and cut butter into flour mixture.  Combine using a fork. (Or just use your hands if preferred).  Mixture should look like cornmeal when well combined.)
  3. Add cold water and combine together with your hands until you've formed a large ball of dough.  (Note: The less you work with pie crust the better it will turn out and the more light and flaky it will be.  DO NOT KNEAD YOUR DOUGH!)
  4. Roll out dough on a flour lined surface.  Using a medium circle shaped cookie cutter, cut medium circles and then press each circle of dough into mini muffin tin.  (I used a 24 cup mini muffin pan, but you can also use two twelve cup pans.)
  5. Bake crust for about 30 minutes, or until crust is slightly browned on top.
  6. While crust is baking, make your filling.
  7. Add frozen berries to a medium sauce pan.  Add honey, vanilla, and spices, and mix until thawed and well combined.
  8. Bring mixture to a boil.  (If you prefer less chunky filling at this point you can run a fork through your berry mixture.)
  9. In a small glass add corn starch and water and mix until well combined.
  10. Once berry mixture has been brought to a boil, add the cornstarch mixture and stir constantly until thickened.
  11. Remove from heat and let cool.
  12. Once the crust cups have cooked, wait for them to cool completely and then remove them from the pan to mini muffin cup liners.
  13. Fill each crust cup with filling all the way to the top.

*You can top your pie cups with whipped cream or anything you like.  I topped mine with lemon zest, and it added just the right flavor!
*Use organic ingredients when feasible.  
*Store in refrigerator. 
Picture
Picture
Picture
1 Comment

Australian Anzac Cookies

11/5/2018

0 Comments

 
Picture
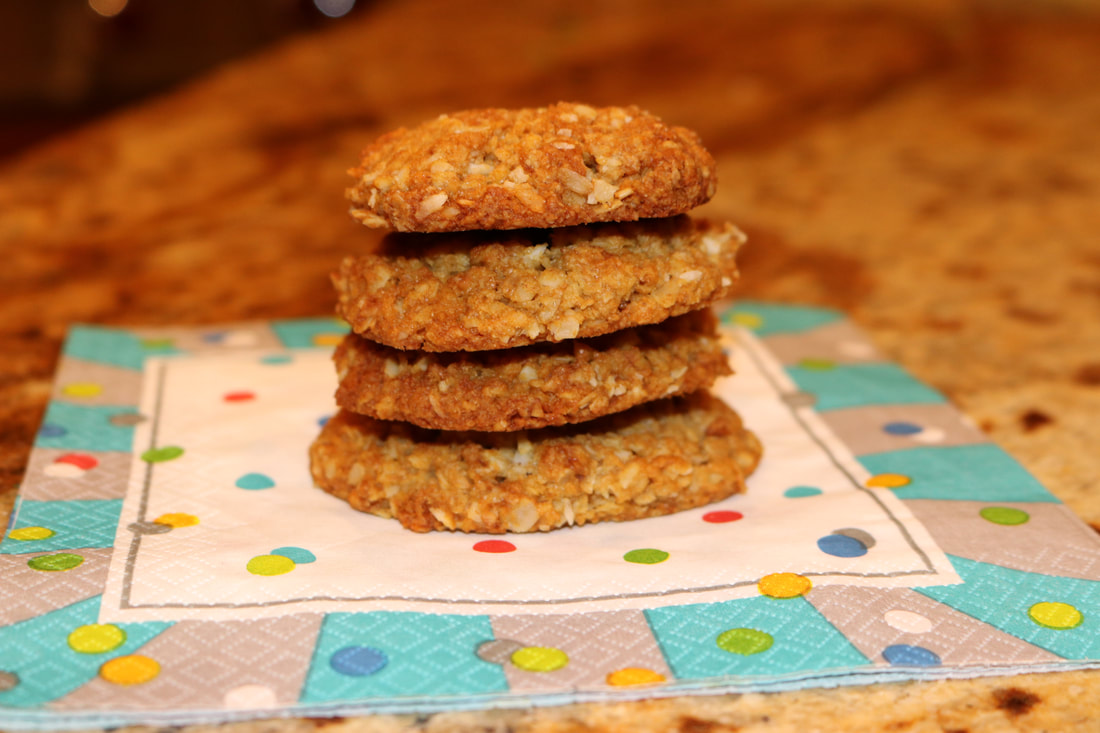
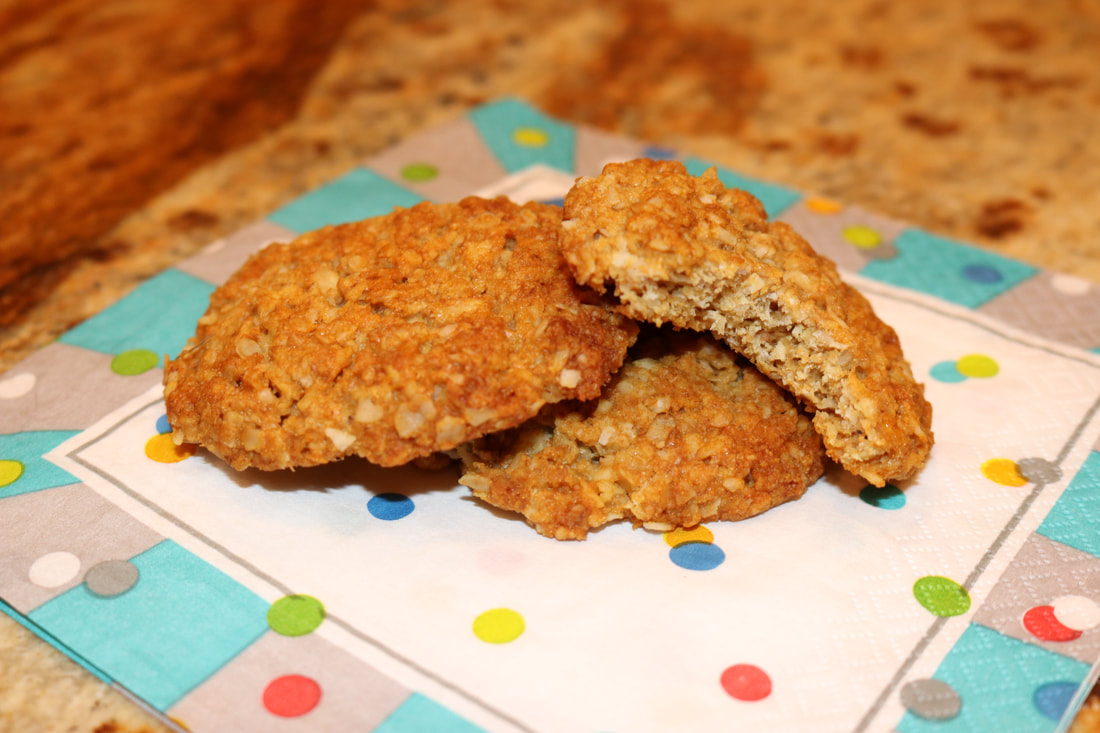
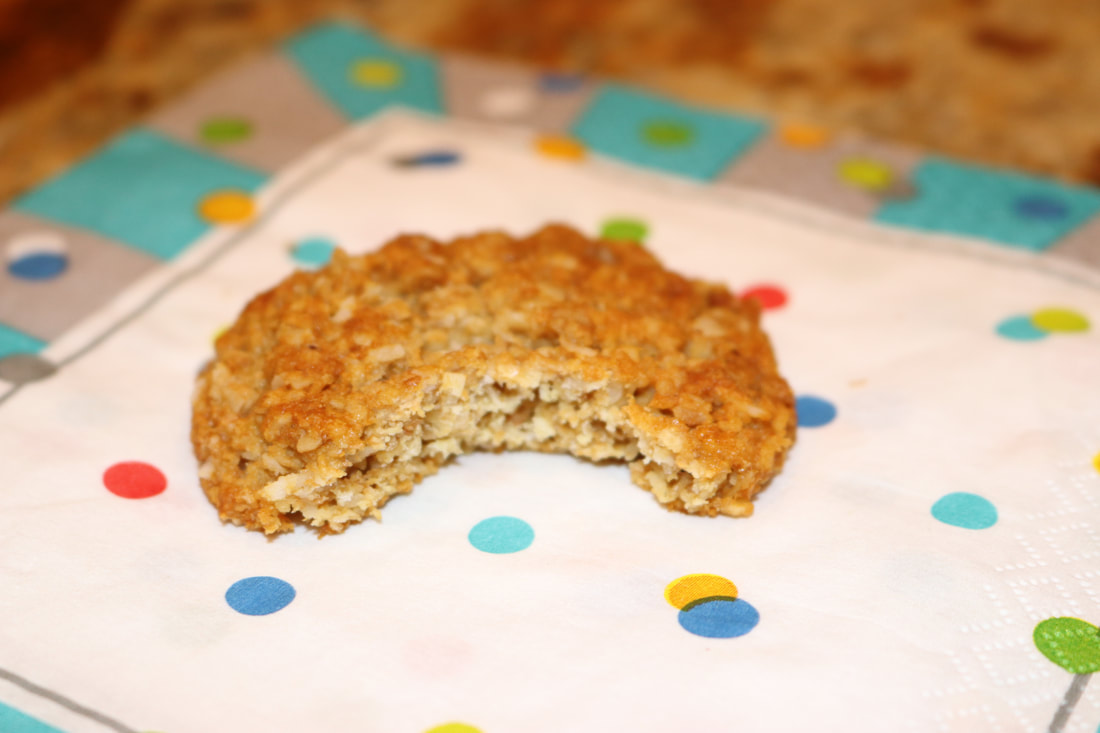
This recipe is actually a special recipe from the mind and heart of my dad!  My dad served a mission for the Church of Jesus Christ of Latter Day Saints in Australia when he was younger, and he recently wanted to recreate this cookie that he had on his mission a lot.  Needless to say, they were a huge success and our family loves these delicious creations now! 

These cookies are made with whole wheat flour, coconut, and oatmeal.  They're soft and chewy on the inside, and are the perfect treat to satisfy your sweet tooth!  Not to mention they are organic, and refined sugar-free!  Yum!

Australian Anzac Cookies
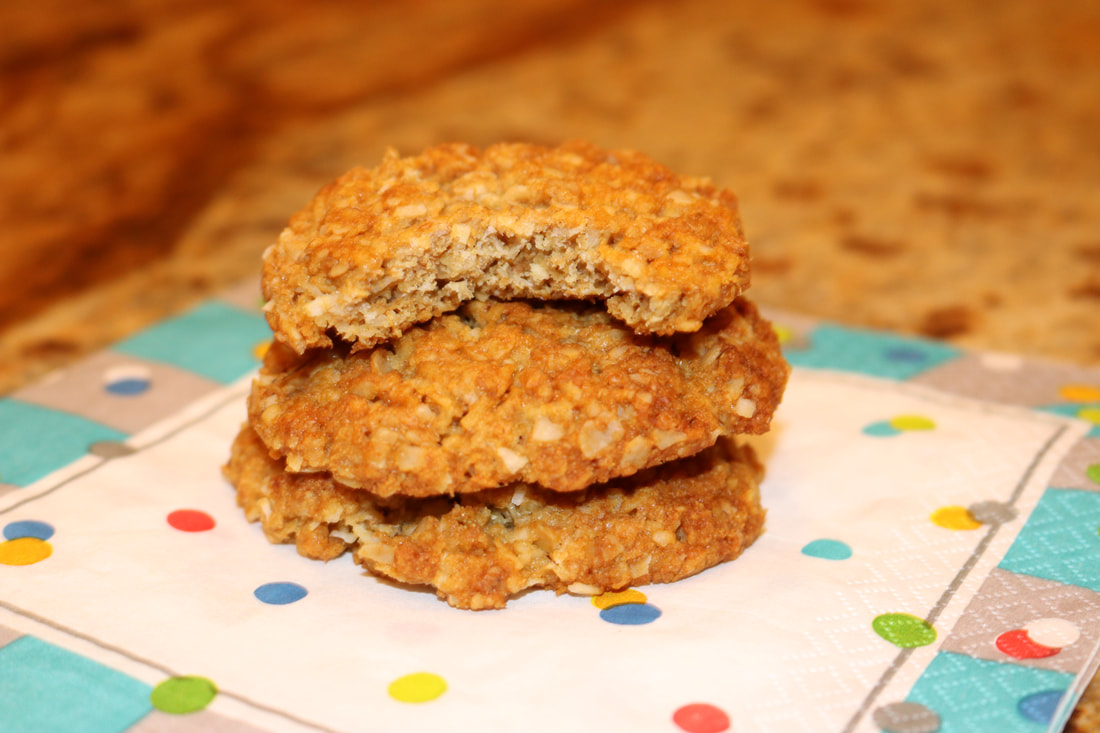
Picture
Ingredients:​
1 cup flour
1 1/2 cup quick oats
1/2 cup golden Lakanto
1/2 tsp. salt
​1/2 cup butter
1/4 cup raw honey
3 Tbs. water
1 Tbs. baking soda

Directions:​​
  1. Preheat oven to 350°F  Line cookie sheet with parchment paper of silicone baking mat.
  2. Mix dry ingredients in a medium bowl (flour, oats, Lakanto, and salt).
  3. Warm butter honey and water in a small saucepan and bring to a low boil, then add baking soda.  Cook and stir until it foams.
  4. Add wet mixture to dry mixture.  Mix until well combined.
  5. Roll dough into one inch balls (or smaller if desired) and place on cookie sheets.
  6. Cook for 12 minutes or until golden brown.

*Use organic ingredients when feasible* 
Picture
Picture
Picture
0 Comments

Chocolate Peanut Butter Cups

11/5/2018

0 Comments

 
Picture
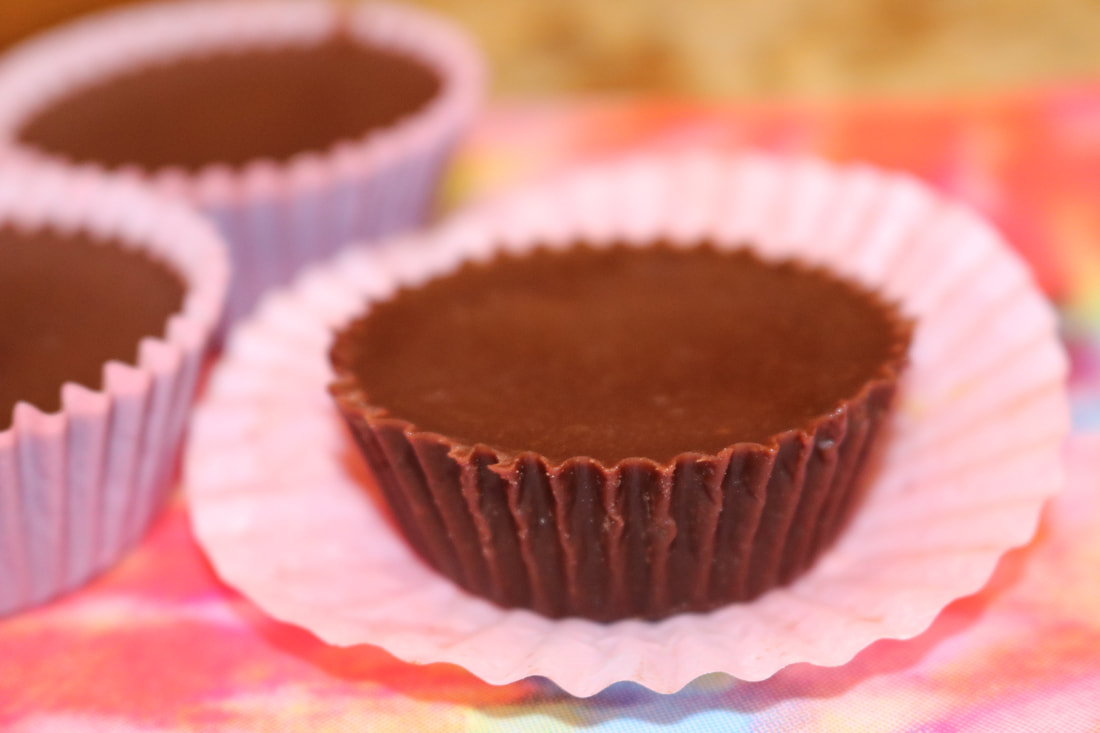
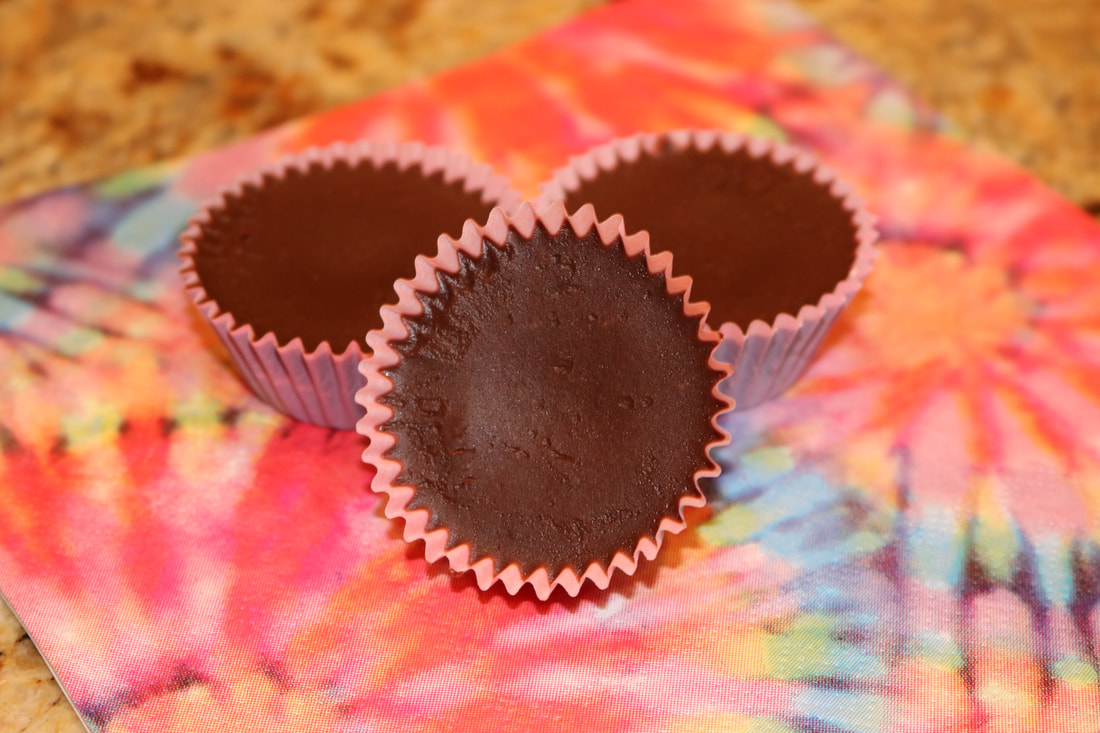
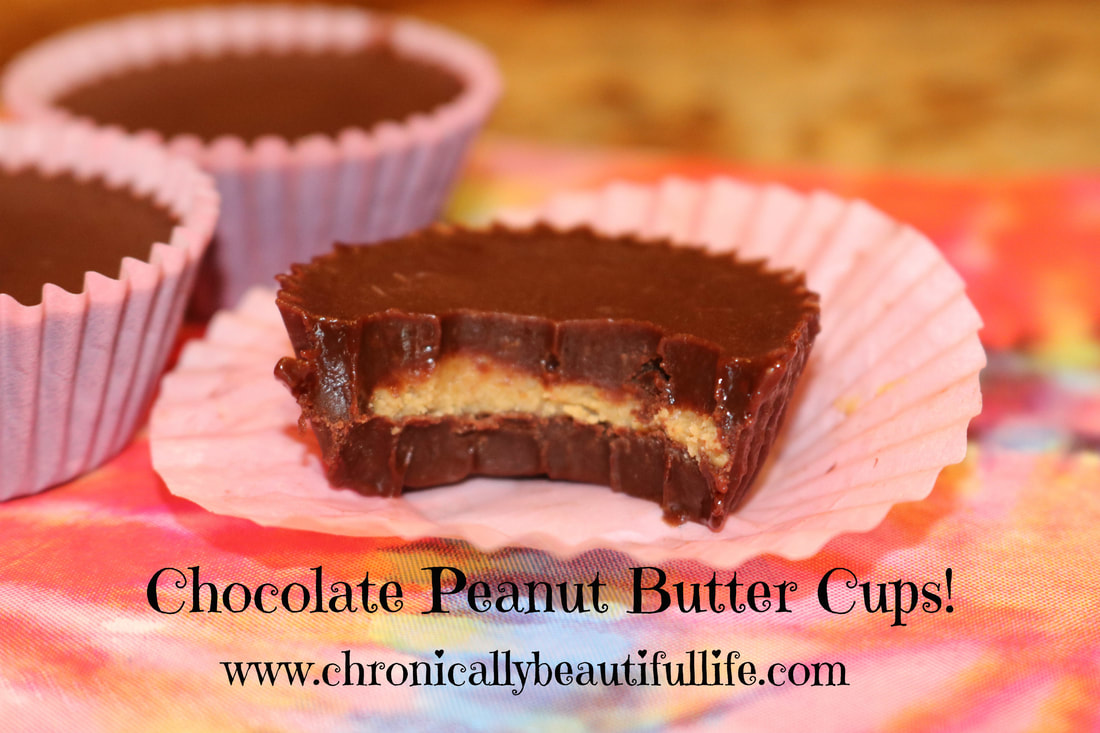
Hello! This is your friendly sugar free chocoholic, and I'm here to tell you that IT IS POSSIBLE to eat chocolate and be healthy!  This is one of my FAVORITE recipes, and I have to consciously decide to only eat one a day because they taste so similar to store-bought candy!  These are so yummy, creamy, and filled with peanut butter!  What a great combination! ;)  These are also organic, and refined sugar-free like always, and makes a great treat for the holidays!

Chocolate Peanut Butter Cups!
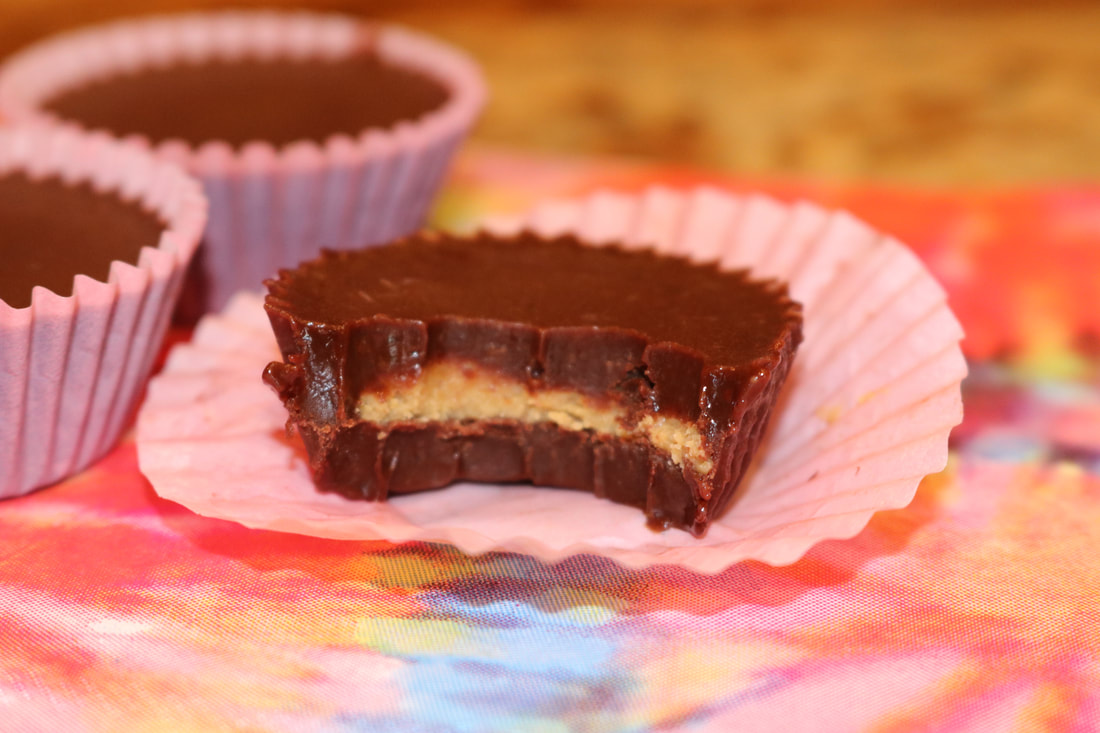
Picture
Ingredients:
1/2 cup coconut oil
1/2 cup almond butter
1/2 cup raw honey
2 tsp. vanilla extract
1/2 cup cocoa powder (at least 80% cacao, sifted)
1/2 cup organic peanut butter
1/4 cup powdered Lakanto
​
1 tsp vanilla extract

​Directions:
  1. Line a 24 cup mini muffin pan with mini muffin liners. 
  2. Melt coconut oil, almond butter, honey, vanilla, and cocoa powder in a small sauce pan on medium heat until well combined and close to boiling.
  3. Remove from heat and place 1 tsp of chocolate into each mini muffin cup.​
  4. Place pan in the freezer for 5-10 mins.
  5. Make peanut butter filling by mixing peanut butter, lakanto, and vanilla in a small bowl until well combined.
  6. Remove pan from freezer and spoon filling into each mini muffin cup.
  7. With the rest of the chocolate miture place 1 Tbs. of chocolate in each cup.
  8. Refrigerate for 30 minutes or until chocolate has solidified.

*Makes 24 chocolates
*Store in refrigerator

Picture
Picture
0 Comments

Refined Sugar-Free S'mores!

8/4/2018

0 Comments

 
Picture
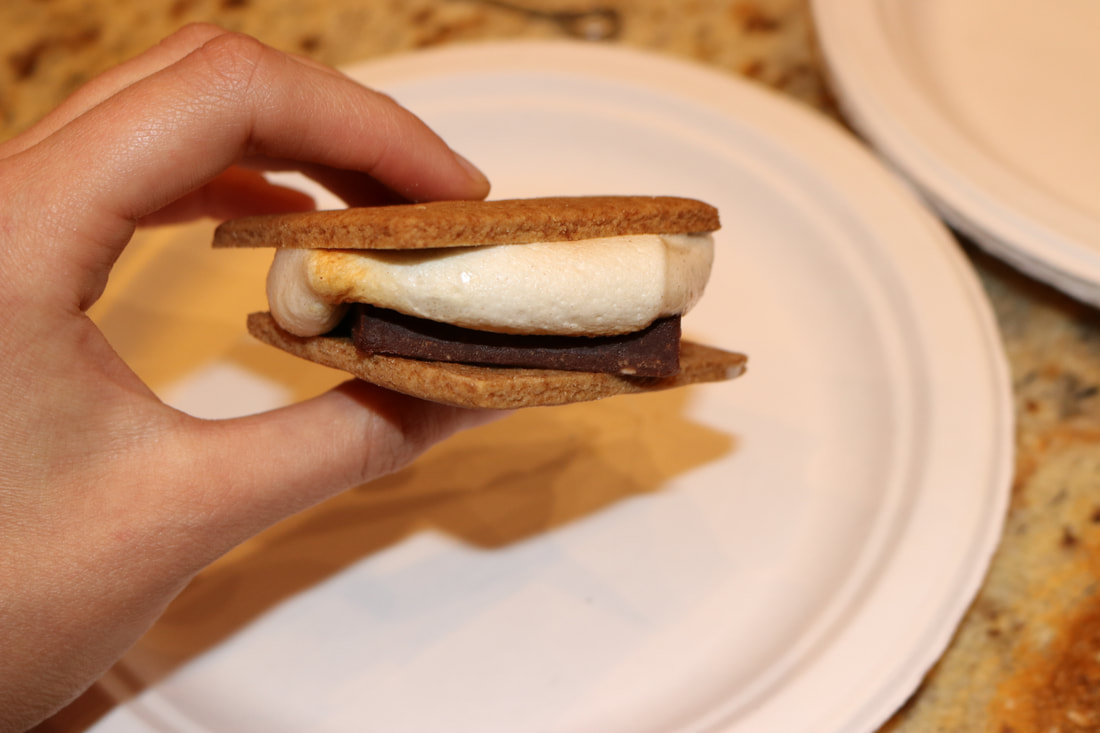
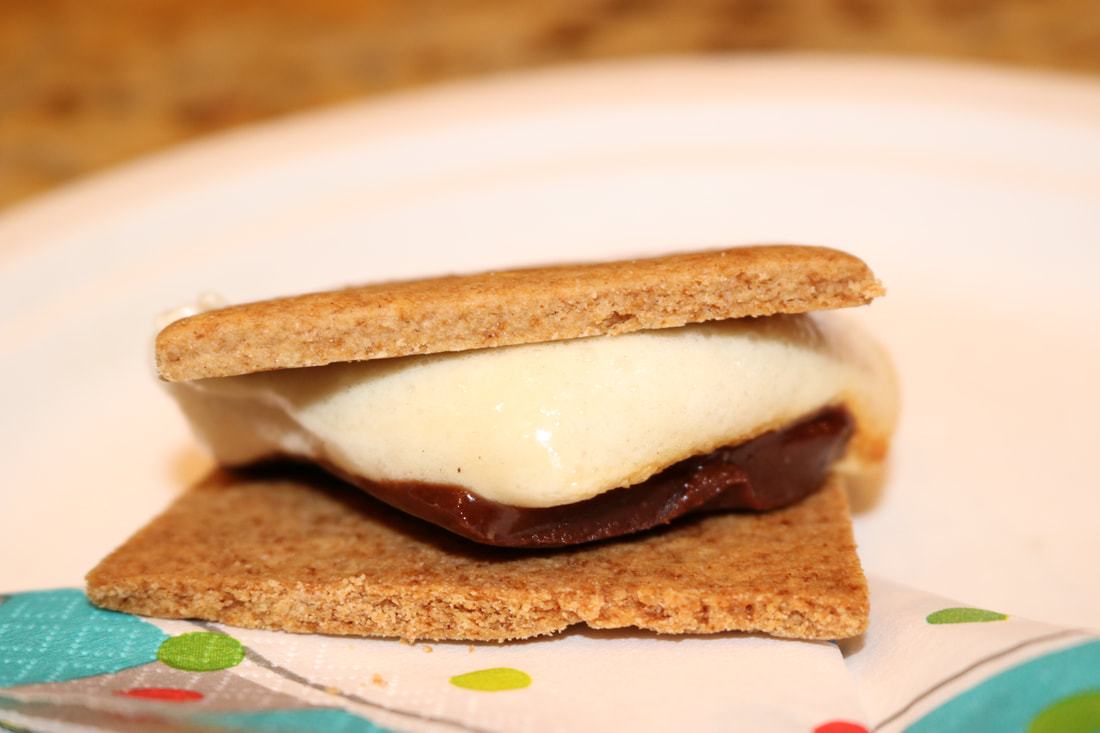
This recipe is honestly one of the most amazing things I discovered this summer!!! 😍😋  Okay, I know what you're thinking... "Why would I want to take the time to MAKE S'more ingredients when I could just go to the store and buy them in half the time?  Well, let's take a minute to evaluate the ingredients in S'more.  Sure store bought marshmallows, Graham crackers, and Hershey's chocolate is a faster option for these summer treats, but that doesn't mean they're a better option for your health.  Have you ever eaten a S'more before and felt kind of sick to your stomach afterwards?  I have!  And so naturally I stopped eating them once I became and adult. 

Let's take a minute evaluate health facts on these products:
First Health Fact:  All three of these foods are massively high in sugar, and corn syrup.  With that in mind, a S'more is pretty much just a sugar cocktail!  Sugar is highly addictive and toxic!  Sugar feeds cancer and other bacteria and parasites in the body, and increases inflammation!  Putting three high-sugar products together wages war on your body, and can very much lead to leaky gut and other auto-immune diseases.

Second Health Fact:  All three of these products are highly processed and filled with chemical additives that are highly addictive and foreign to our bodies.  When we ingest such substances, our body doesn't recognize it as food, and can make us sick simply because our body is on overdrive trying to protect us from "unknown substances." 

Third Health Fact: These foods lack nutrients that whole foods, or food made ourselves, contain.  When we eat large amounts of food that lacks nutrients it leaves our bodies feeling nutrient depleted, and can lead us to feeling weak or sick after we eat.

So... is it possible to find a S'more that has little sugar, proper nutrients, AND zero harmful additives?  Yes it is!  And not only are they healthy, but they also taste AMAZING and are perfect for every summer occasion!  They're also really not that difficult to make, and can be made in large batches and stored in the freezer so they don't go bad quickly!

​So what are we waiting for!?  Let's get started! 😋😁

Refined Sugar-Free S'mores!

Picture

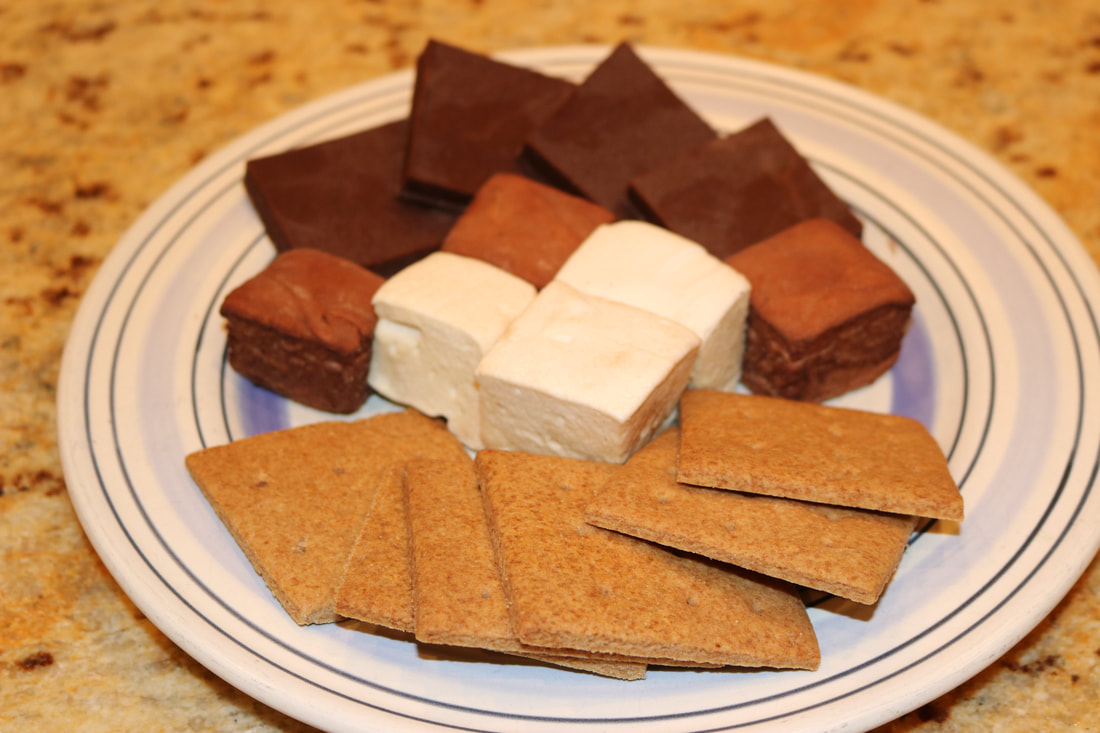
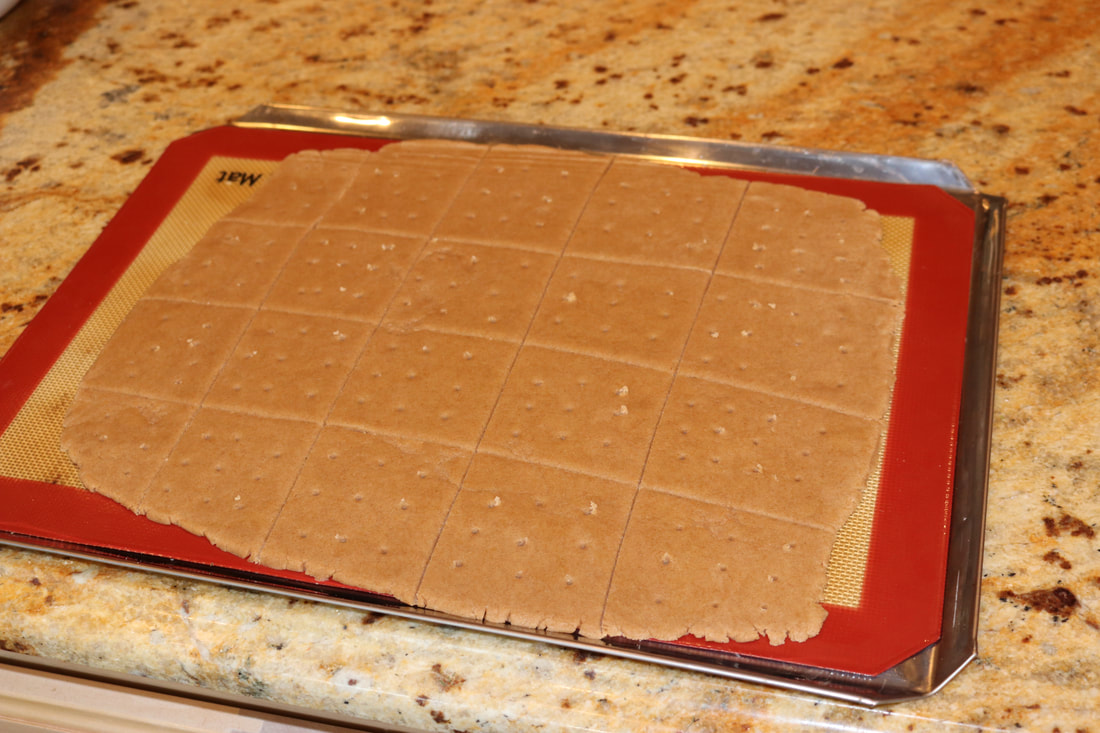
Homemade Graham Crackers!
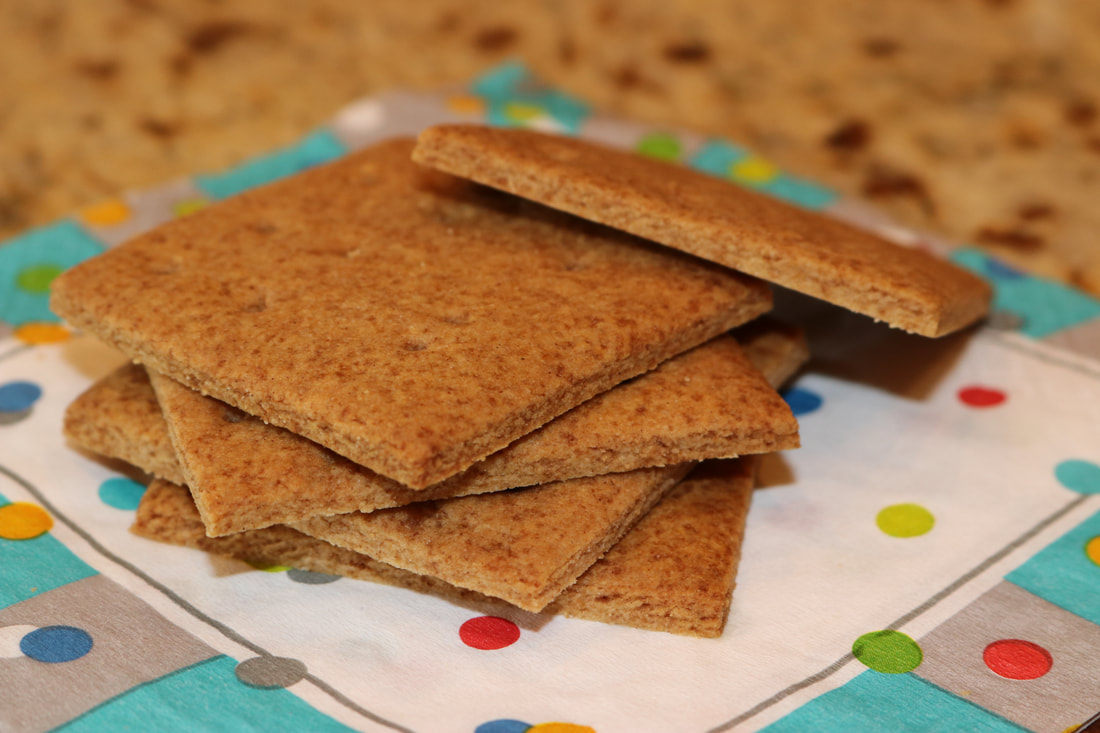
Picture
Ingredients:
  • 1 cup butter (softened)
  • 6 Tbs. golden Lakanto sweetener
  • 1/2 tsp. salt
  • 3 Tbs. raw honey
  • 3 cups whole wheat flour
  • 1 tsp. baking soda
  • 1 tsp. cinnamon
  • 2 tsp. water
Directions:
  1. In a stand mixer, mix butter, Lakanto, salt, cinnamon, and honey.  Mix until well combined.
  2. Add in baking soda and then gradually add in flour one cup at a time.  Make sure flour is well combined after each cup before adding the next cup.
  3. Remove from stand mixer and form dough into two balls.  This is also when you can add the water if your mixture seems to dry.  Mixture should hold together but not be sticky.
  4. Roll dough onto silicone baking mat.  Cut or score into individual cracker sizes. Use a skewer or toothpick to make holes in crackers.
Picture
  • Place in freezer on stainless steel baking sheet for 30 mins. to harden.
  • Remove from freezer and separate dough into individual crackers on the baking sheet.  Bake at 350 for 10-12 minutes or until crackers begin to brown.
  • Remove from oven and transfer to cooling wrack.  Make sure crackers are totally cool before using them for S'mores!

Homemade Marshmallows!
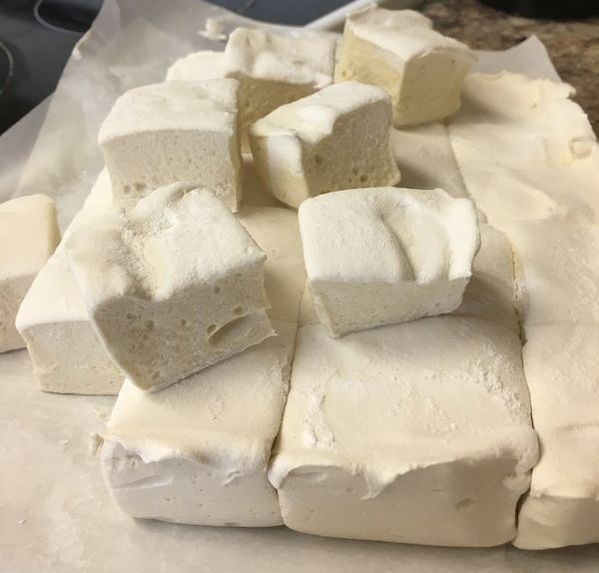
Picture
Ingredients:
  • 1 cup water
  • 3 Tbs. powdered gelatin
  • 1 cup raw honey
  • 1 tsp. vanilla extract
  • Arrowroot starch to coat the outside of marshmallows
Directions:
  1. Grease and line and 8x8 inch pan with parchment paper on both sides.
  2. Dust parchment paper with arrowroot starch so marshmallows are not sticky at the bottom when they are removed.
  3. In your mixer, add gelatin with 1/2 cup water.
  4. While the gelatin in softening, pour the other 1/2 cup water in a sauce pan with honey, vanilla, and salt.  
  5. Turn the burner to a medium high heat.  Bring the mixture to a boil.  Place a candy thermometer in the sauce pan and continue to boil mixture until it reaches 240 degrees (soft ball stage).  This will take approximately 7 to 8 mins.
  6. Immediately remove from the sauce pan from the heat.
  7. Turn your stand mixer to low/med.  Slowly pour the honey mixture into the bowl combining it with the softened gelatin.  Turn the mixer to high and continue beating the mixtures until it becomes thick like marshmallow cream. (About 10 mins.)
  8.  Pour marshmallow cream into the parchment lined pan.
  9. Using a rubber spatula, smooth the top and add another dusting of arrowroot starch on top.
  10. Cut a piece of parchment paper the size of your pan and top your marshmallow pan with it.  Using your hands, gently press down top to unsure an even top.
  11. Allow your marshmallows to set for 4-6 hours.  (You'll know it's ready by pushing down and the texture is bouncy.
  12. Once your marshmallows have set, cut into squares. 

*This recipe originally appeared on laurafuentes.com

Homemade Chocolate Bars!
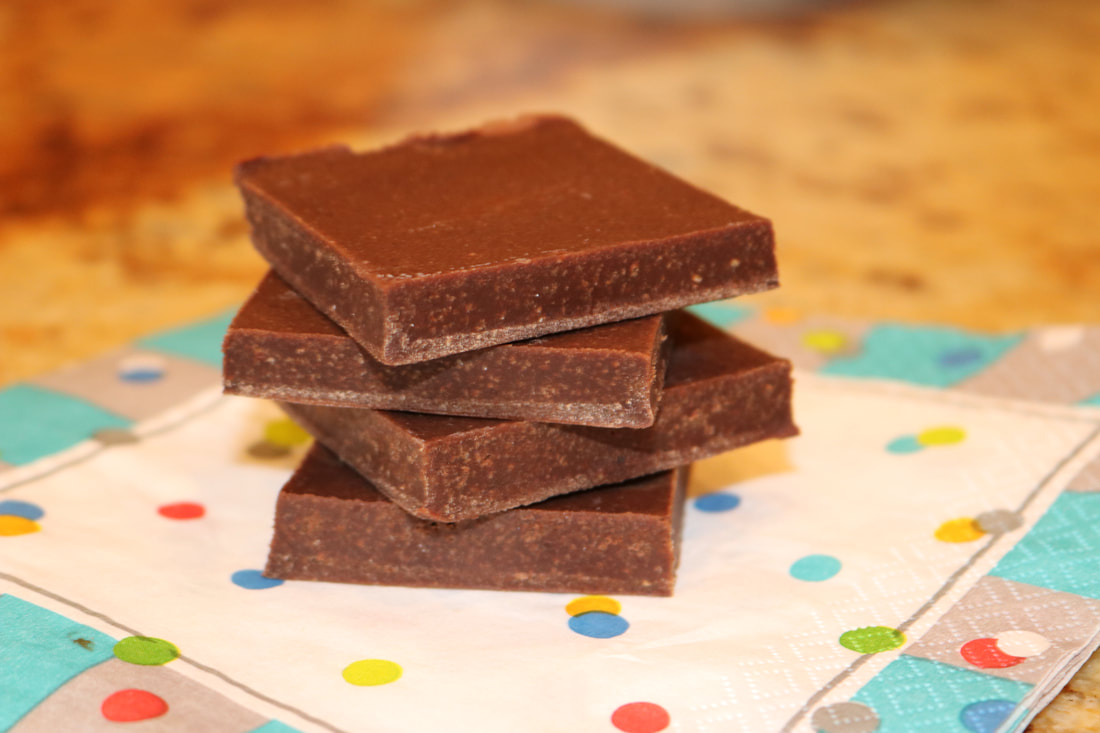
Picture
Ingredients:
  • 1/2 cup coconut oil
  • 1/2 cup raw honey
  • 1/2 cup creamy almond butter
  • 1/2 cup sifted cocoa powder
  • 2 tsp. vanilla extract
Directions:
  1. Combine all ingredients except cocoa powder in a small saucepan on medium heat.  Heat and stir until well combined and almost boiling.
  2. Sift cocoa powder into mixture.  Stir and heat until completely combined and slightly thickened.
  3. Pour into a 9x9 inch baking pan lined with parchment paper on both sides.
  4. Refrigerate until firm (about 30-40 mins.)
  5. Cut into squares with a pizza cutter and freeze until hard.
  6. Once frozen, break into squares and store in the freezer.

And Now for the S'mores!

You know the drill!  Roast the marshmallow until golden brown and sandwich between two Graham crackers and chocolate!  😋😍😁
Picture
Picture
0 Comments

Chocolate Zucchini Sheet Cake

7/26/2018

0 Comments

 
Picture
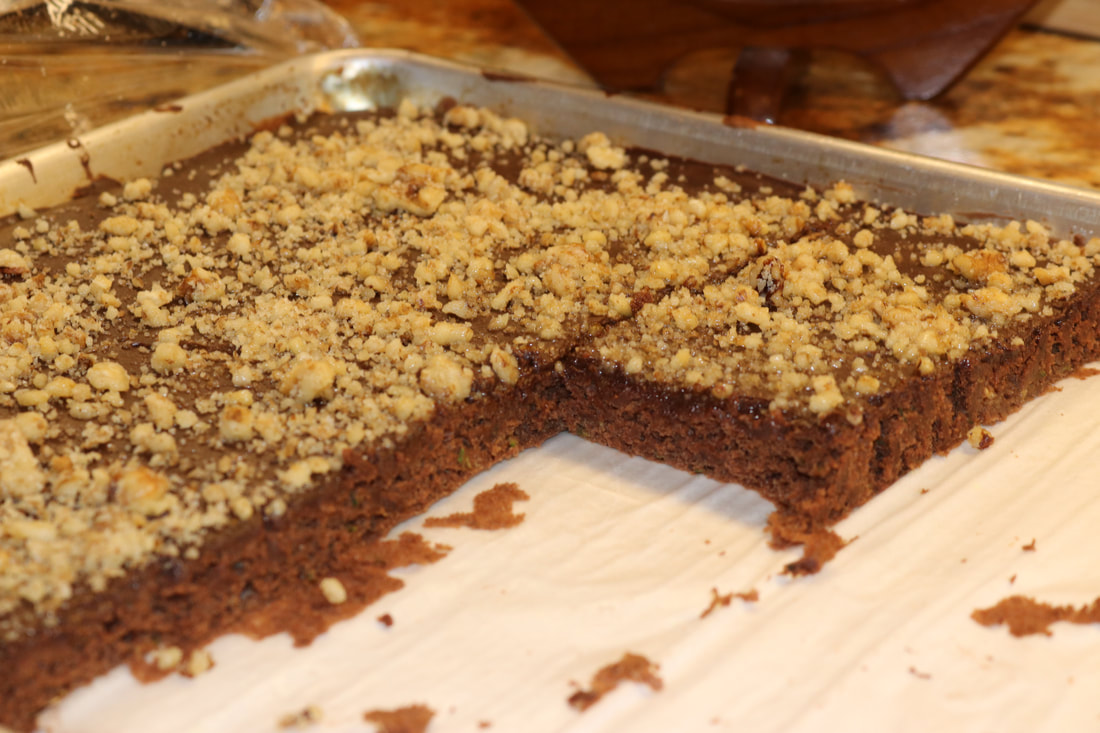
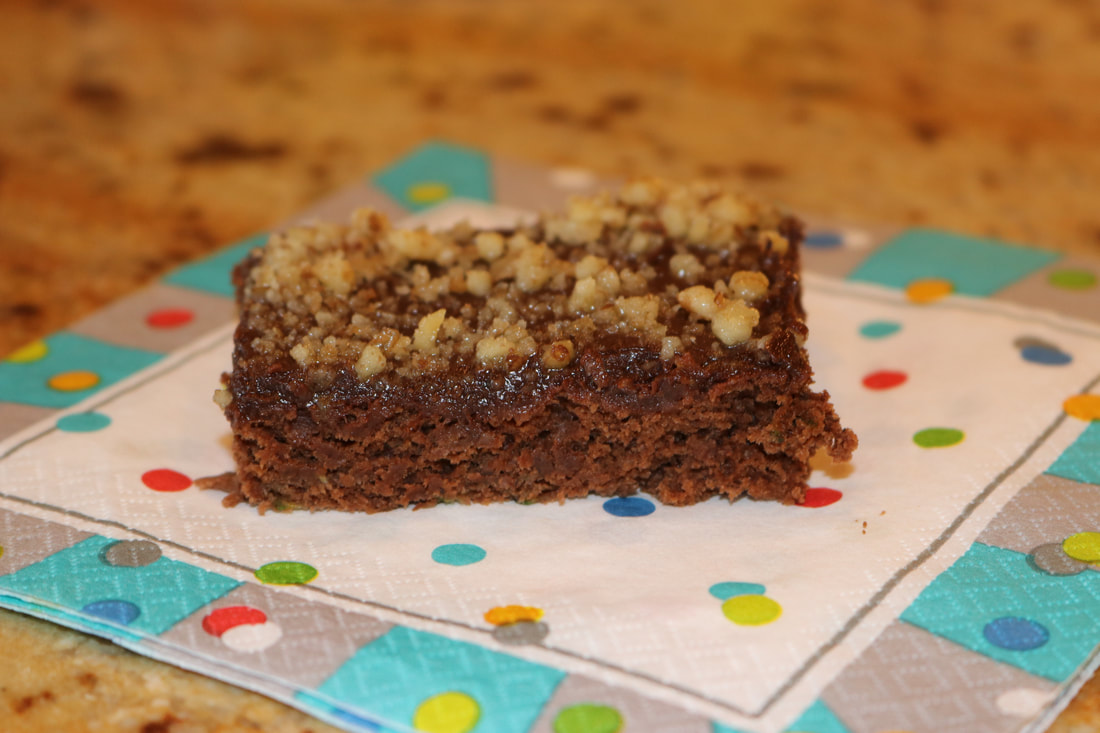
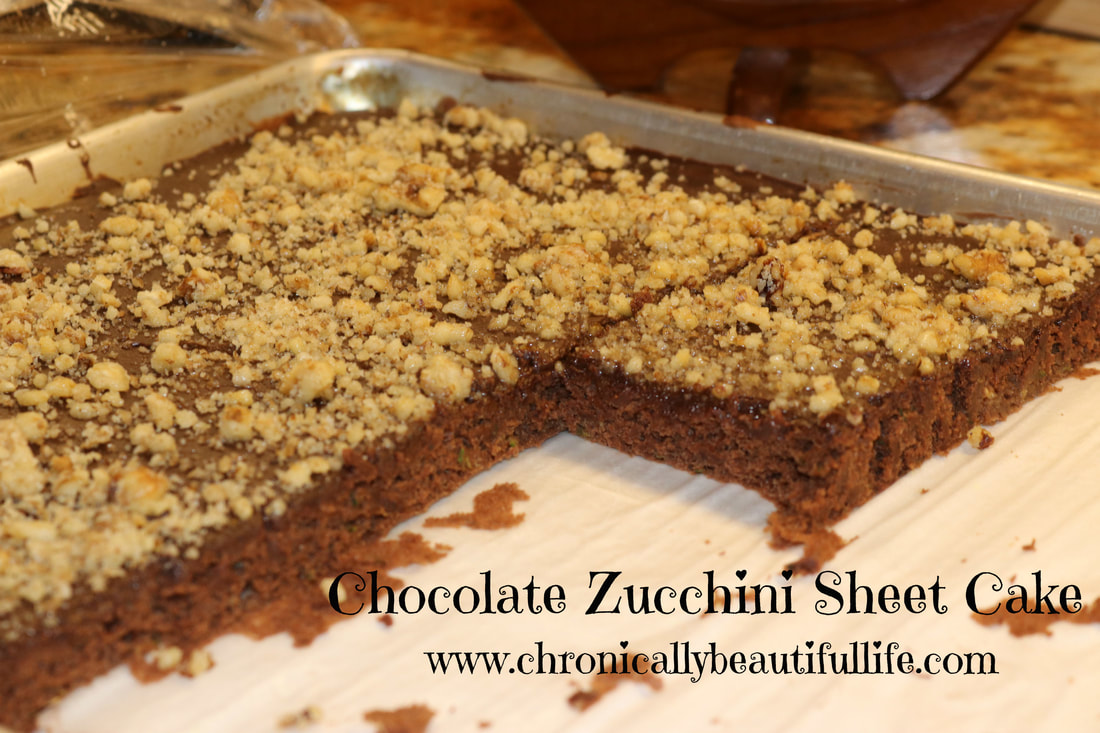
This sheet cake is brought to you by my incredible sister, Megan Dalton, who has been cooking, eating, and feeding her family clean, whole food for years!  Megan is a wife and mother of two children, and loves creating delicious masterpieces in her kitchen!  She cooks organic, refined sugar-free in all of her recipes and she lives and believes the core concept that eating healthy is an essential part of having a healthy and happy family!  Megan is also proof that it is possible to raise a family and be able to afford, cook, and feed your family whole, clean, and organic foods.  Megan is an inspiration to many of the mom's out there who feel like eating healthy is unreachable in the busy life of motherhood.  Well folks, it's possible, and this delicious sheet cake, comes straight from Megan's kitchen!  
Picture
This recipe combines the health benefits of zucchini, and the sweet taste of chocolate into one fantastic sheet cake that is perfect for parties, or large gatherings!  This cake is the perfect amount of sweetness!  It's super moist and melts in your mouth!  It's made with all organic ingredients and is refined-sugar free!  Chocolate cake that feeds your body with proper nutrients?!  Does that even exist!?  Yes it does!  Let this sheet cake take your taste buds to chocolate heaven!    

Chocolate Zucchini Sheet Cake
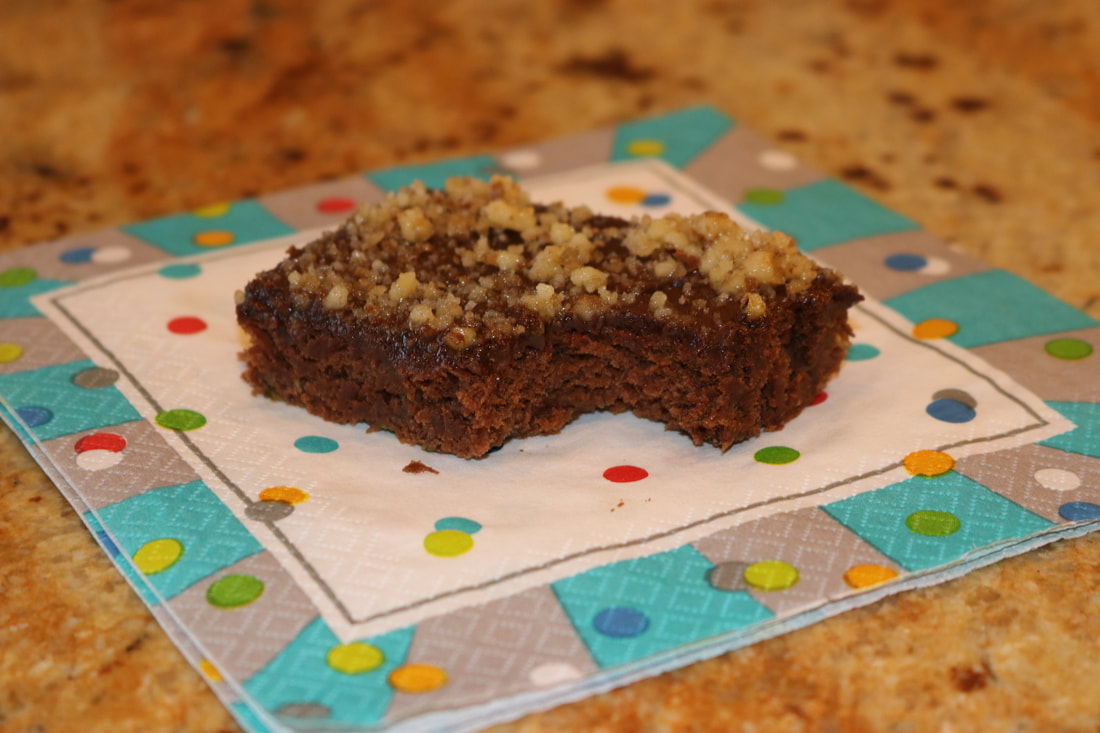
Picture
Ingredients:

Cake:

1/2 cup butter (melted)
1/2 cup buttermilk or coconut milk w/lemon 
4 eggs
1 1/2 tsp. vanilla extract
1 cup classic Lakanto Monkfruit Sweetener
1/4 cup cocoa powder (heaping)
2-3 bananas
1 3/4 cups flour (preferably whole wheat)
1/4 tsp. salt
1 tsp. baking soda
2 cups grated zucchini

Frosting:
1/2 cup butter
1/2 cup powdered Lakanto
4 Tbs. cocoa powder (heaping)
6 Tbs. coconut milk
1 tsp. vanilla extract
dash of salt
1/2 cup walnuts (optional)

Directions:
  • Preheat oven to 350°
  • Sift sugar, flour, cocoa, salt, and soda together in medium bowl and stir until combined.  Set aside.
  • Grate 2 cups zucchini.  Set aside.
  • Mix eggs, milk, and vanilla in large bowl.
  • Add the dry ingredients to the wet ingredient and stir until well combined.
  • Add mashed bananas to butter and then add to the mixture.  Stir until well combined.
  • Add zucchini and mix by hand.  DO NOT over-mix!
  • Bake 20-22 minutes in a sheet pan lined with parchment paper.
  • Make icing while waiting: Combine icing ingredients and whip together in stand mixer.
  • Remove cake from the oven and pour chocolate frosting over cake immediately.
  • Top with nuts and let cool.
Picture
Picture
0 Comments

Chewy Molasses Cookies

7/12/2018

1 Comment

 
Picture
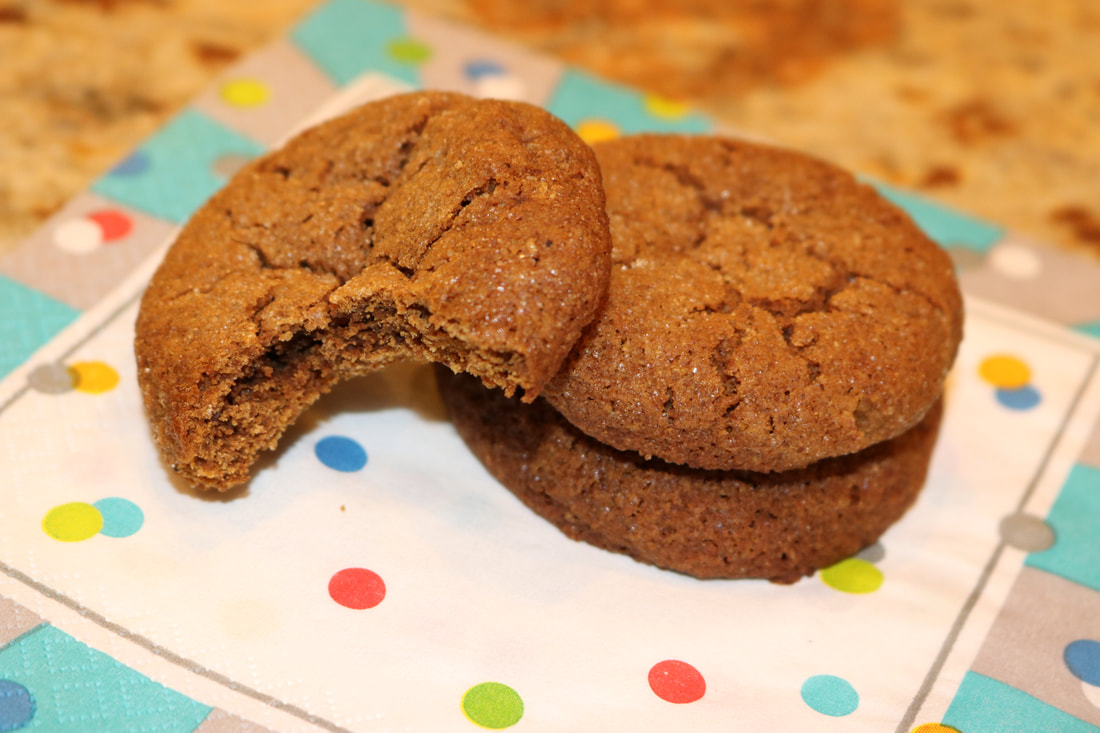
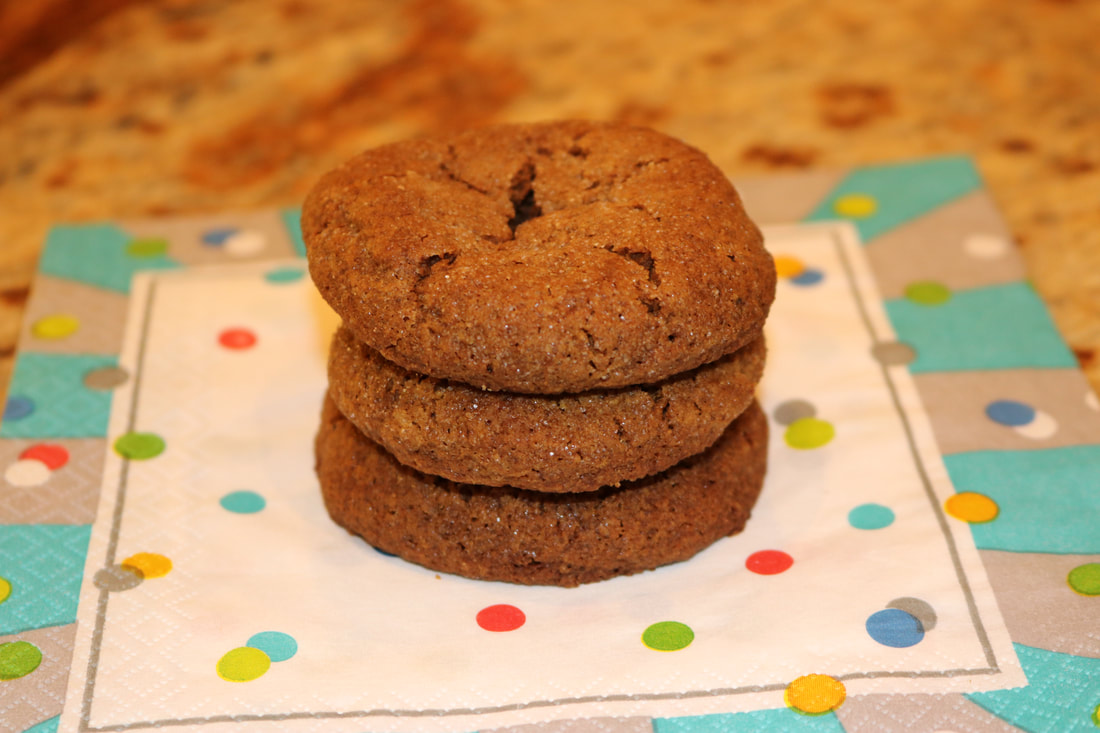
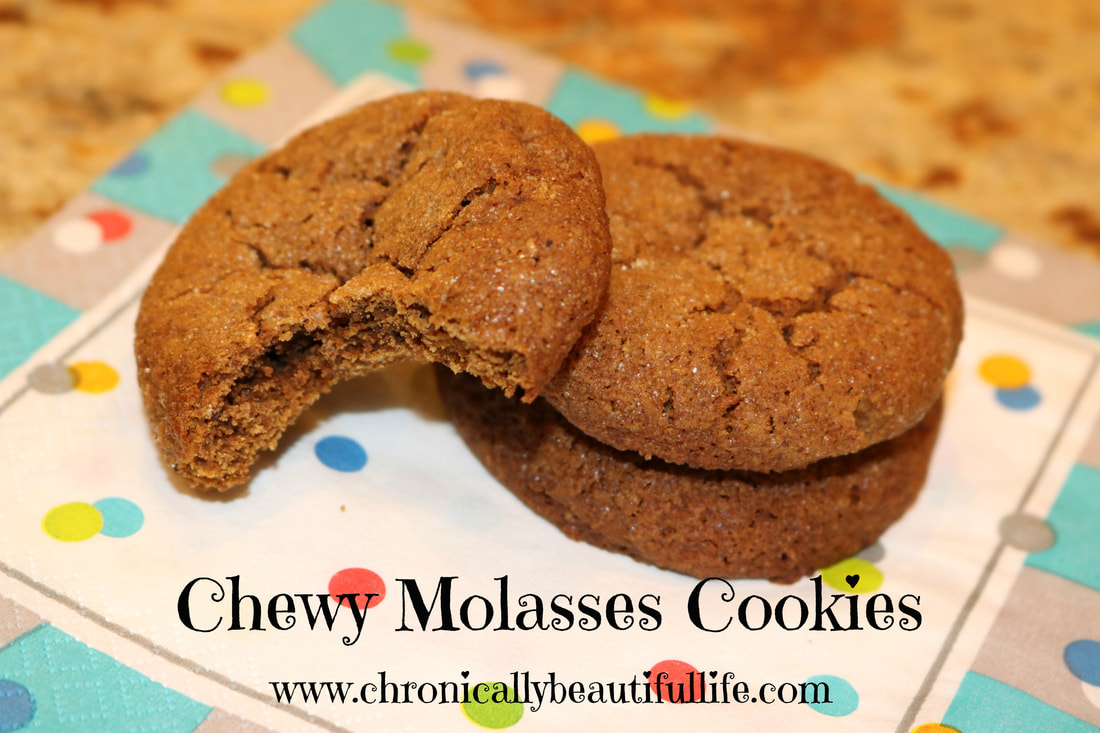
I've always LOVED ginger snaps!  Except for the snapping part... So, I have always resorted to a chewier version of ginger snaps.  These molasses cookies are soft, chewy, and full of flavor!  I've found that getting the right texture in a cookie that is refined-sugar free can be incredibly difficult, and they often come out cakey and dry.  The good news is that I've mastered the perfect cookie texture on these babies, and they are still refined sugar free!  

For these cookies we used Lakanto Monkfruit sweetener:  The vegan, non-GMO, zero calorie, zero after taste, and zero glycemic index sweetener!  Lakanto comes from a fruit and fits all kinds of diets!  Who says you have to stop satisfying your sweet tooth once you go refined sugar free!? 🤣😁😊👍 

Chewy Molasses Cookies
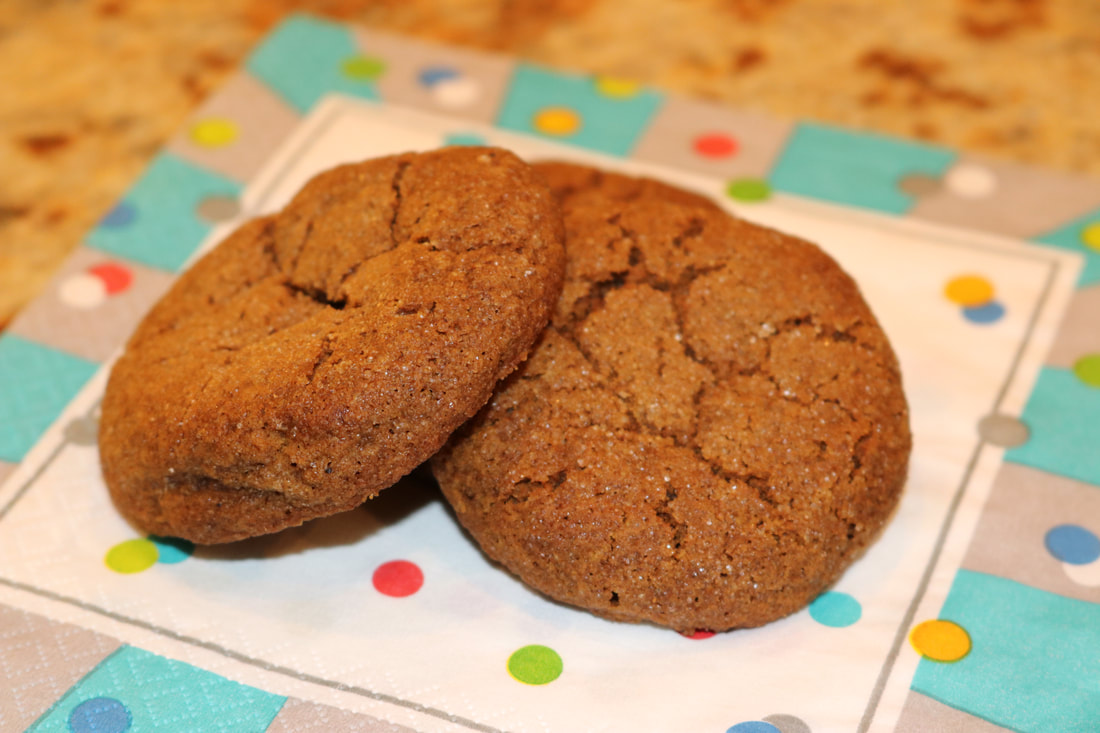
Picture
Ingredients:
1 1/2 cups salted butter (softened to room temperature)
1 cup Lakanto Monkfruit Sweetner
1/3 cup raw honey
1/2 cup molassses
2 eggs
4 cups whole wheat flour
4 tsp. baking soda
2 tsp. cinnamon
2 tsp. ground ginger
1 tsp. ground cloves
1 tsp. Redmond salt

Directions:
  1. Preheat oven to 375° 
  2. In a medium bowl whisk together flour, soda, cinnamon, cloves, ginger, and salt.  Set aside.
  3. In a bowl with an electric mixer, beat together butter, Lakanto, and honey on medium speed until well combined and fluffy.
  4. Mix in the eggs, one at a time.
  5. Add the molasses and beat on medium speed until well combined.  Scrape sides of bowl if need be.
  6. Gradually add in the mixture of dry ingredients and mix until well combined.
  7. Cover bowl with plastic wrap and refrigerate for 30-60 mins or until completely chilled. (If you do not chill your dough, it will be very difficult to roll dough into balls to bake, and your cookies will be much flatter and crunchier after they are baked.)
  8. Roll the dough into small one inch balls.  Fill small bowl with sufficient Lakanto sweetner and roll each ball in the sweetener until it is completely coated.  Place cookies on a cookie sheet lined with parchment paper or silicone baking sheets one inch apart. 
  9. Bake for 9 minutes or until the cookies begin to slightly crack on top.  (They will crack more when cooling.)
  10. Remove from oven, let cool for a minute or two and then transfer cookies to wire wrack.

​*Makes about 4 dozen cookies.
Picture
Picture
1 Comment

Chocolate Chip Cookies!

6/11/2018

1 Comment

 
Picture
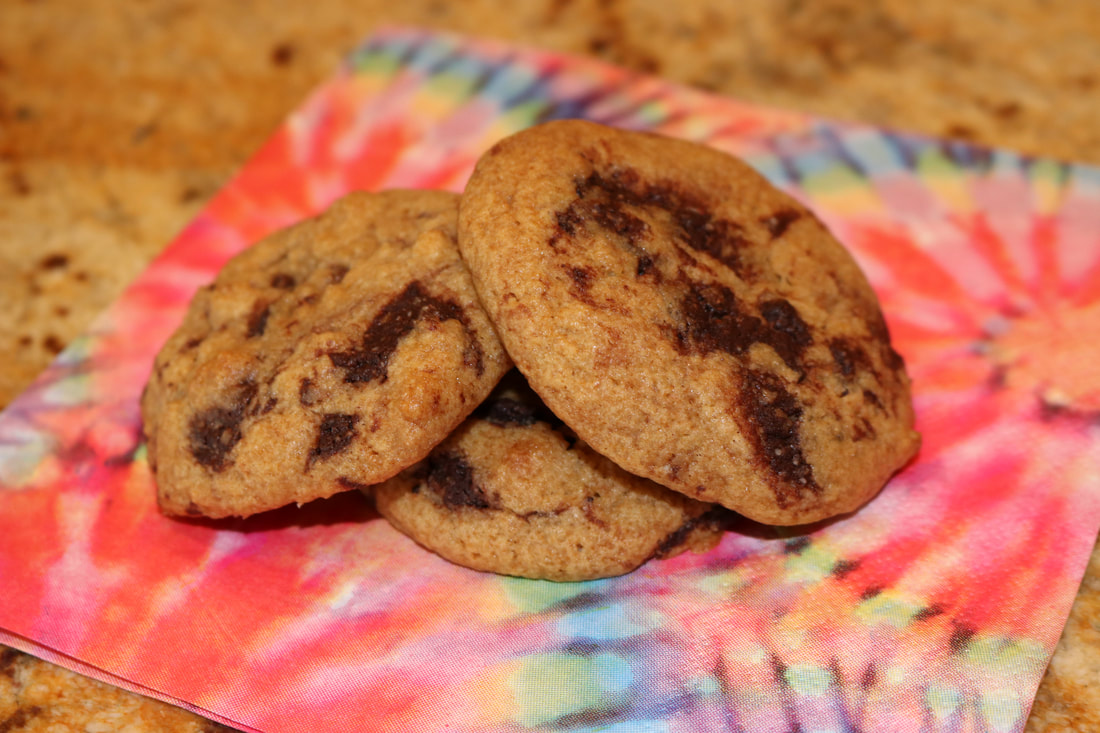
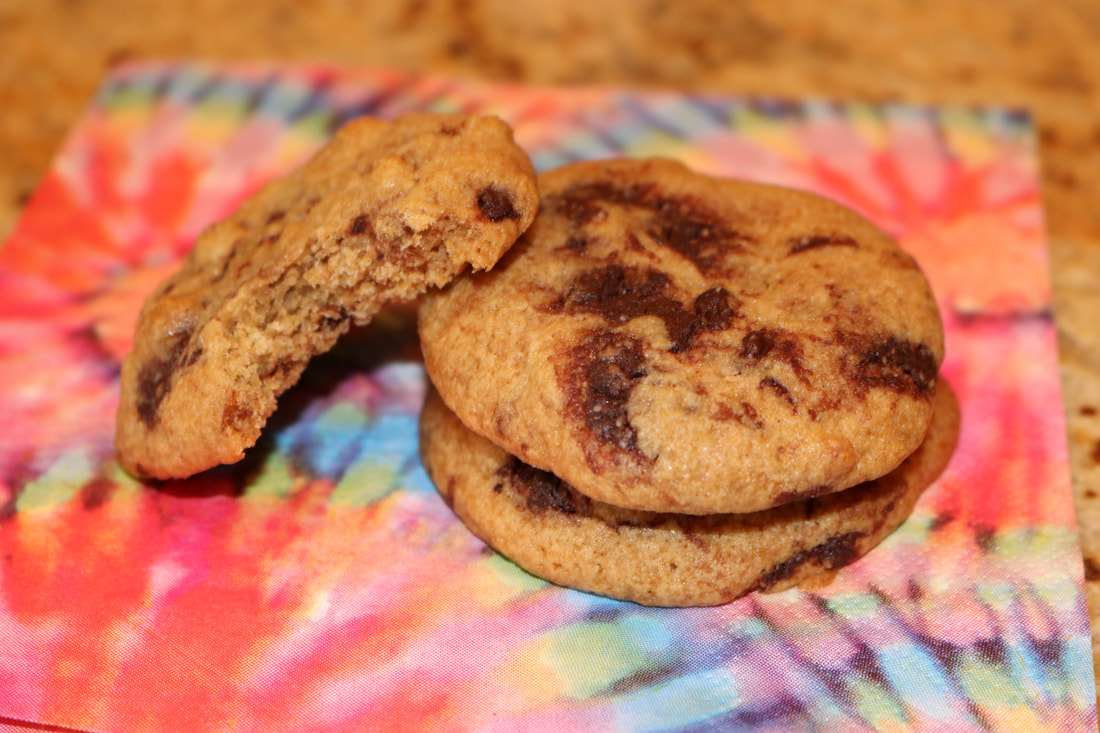
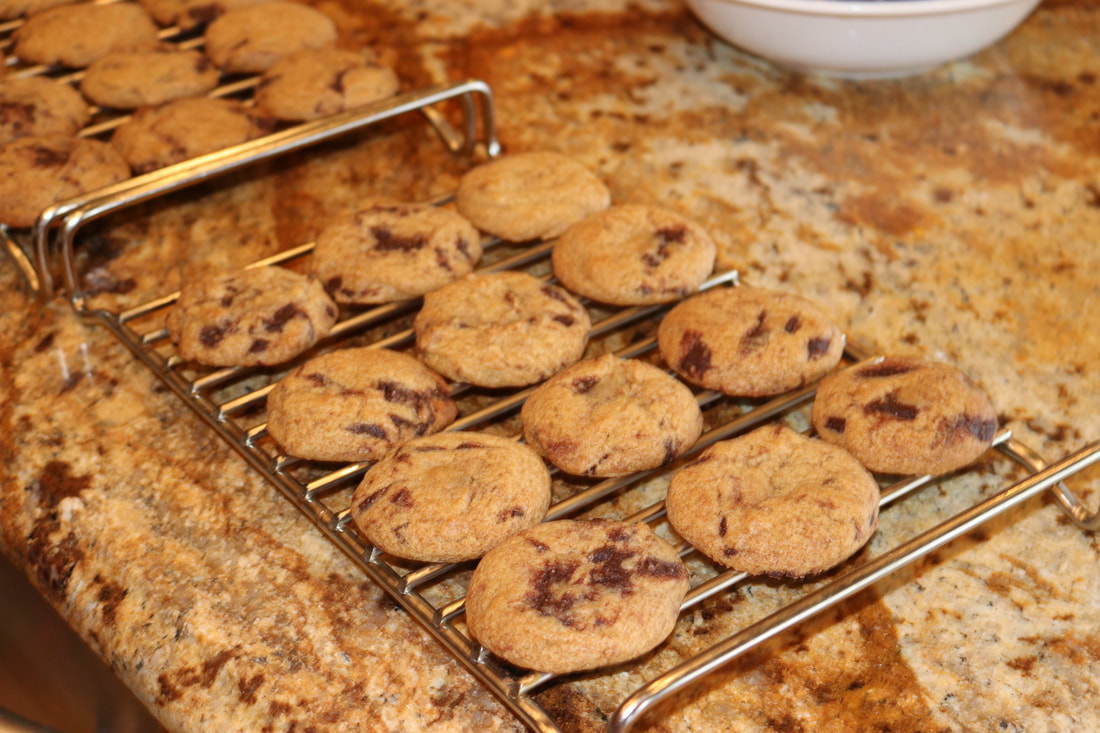
I have just been beside myself lately!  I've spent years wanting chocolate chip cookies again, but there's always been the small dilemma: Refined-sugar free chocolate chips with zero harmful additives don't exist!  So for this recipe I got creative and used the chocolate recipe that I've posted prior to this post.  You simply remove the pre-made chocolates from the fridge, chop them into medium sized chunks, and throw them in the batter the same way you you would regular chocolate chips!  Easy!  And much healthier! 😉

So without further ado, we present to you organic, refined-sugar free chocolate chip cookies!  For all the health nuts out there who still want to enjoy a taste of their childhood every now and again. 😉💕😊 

Chocolate Chip Cookies!
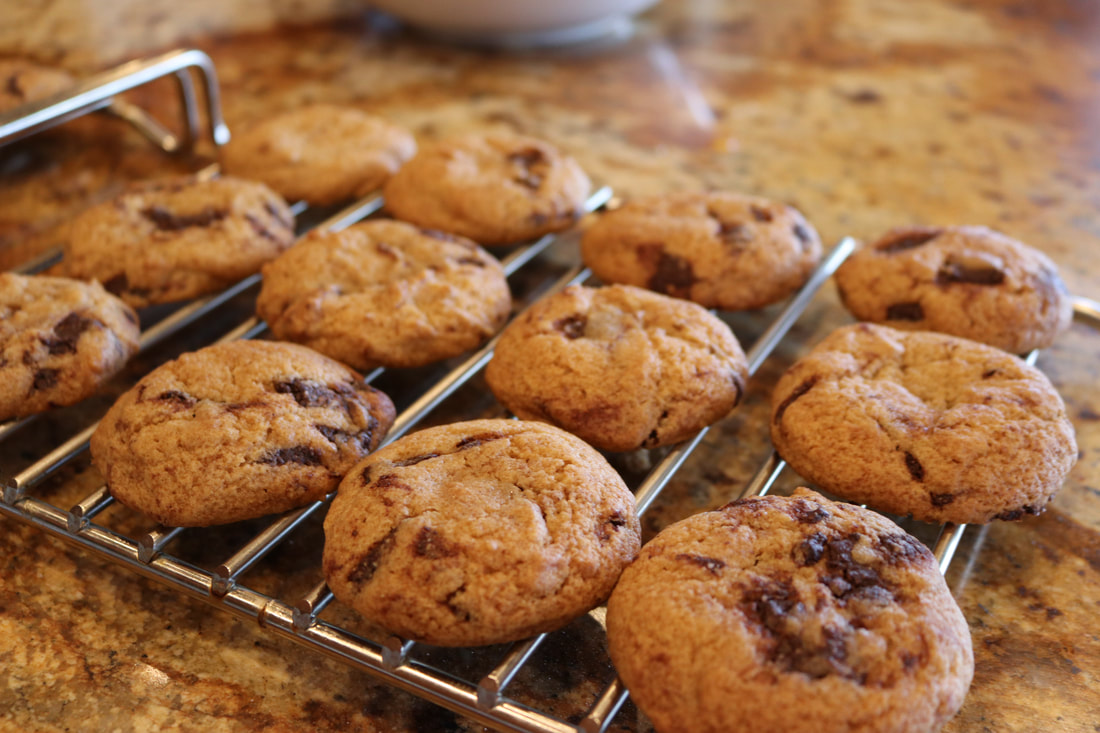
Picture
Ingredients:
2 cups whole *wheat flour
1/2 tsp. baking soda
1/2 tsp. salt
3/4 cup salted butter, melted and slightly cooled
1/2 cup golden Lakanto Monkfruit sweetner
1/3 cup raw honey
1 Tbs. vanilla extract
1 egg
1 egg yolk
2 cups chopped homemade chocolates

*I used organic sprouted whole wheat flour, but any whole wheat flour will work the same
** Here at Chronically Beautiful we strive to keep all ingredients in our kitchen organic and free of any harmful additives in order for our food to be as clean and healthy as possible.  I would highly encourage you as you shop for your ingredients to buy and use as many organic as you can!

Directions:
  • Preheat oven to 325° F  Line two stainless steal cookie sheets (try and avoid aluminum pans as much as possible to avoid heavy metal contamination) with parchment paper or silicon baking sheets. 
  • Sift together flour, baking soda, and salt.  Set aside.
  • In a medium bowl, cream together butter and sweeteners until well blended.  Beat in vanilla egg, and egg yolk until creamy.
  • Mix in the sifted ingredients until just blended.
  • Remove pre-made chocolates from the fridge and quickly chop into small chunks.  Throw chopped chocolate in fridge for 5-10 minutes to avoid melted chocolate in the batter.
  • Add chocolate chips and gently fold into batter.
  • Spoon large dollops of dough onto cookies sheets.
  • Bake for 10-15 minutes or until cookies are light golden brown on top.
  • Let cool and enjoy! 😁
Picture
Picture
Picture
1 Comment

Claire's Famous Chocolates!

6/11/2018

3 Comments

 
Picture
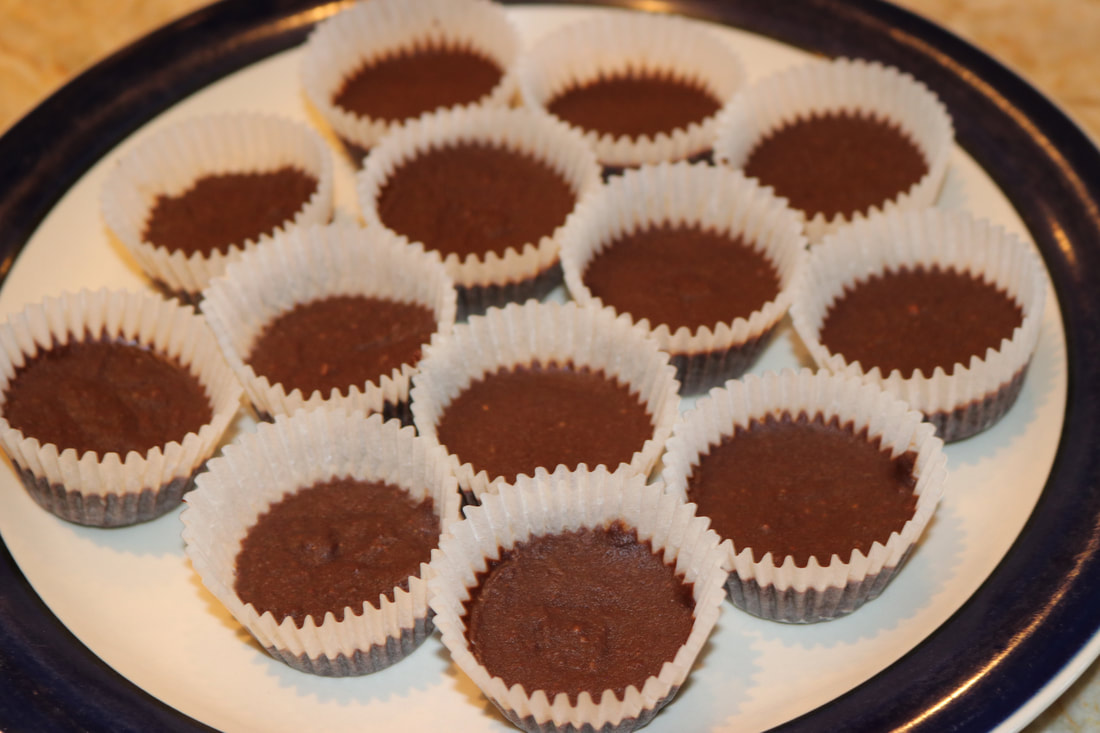
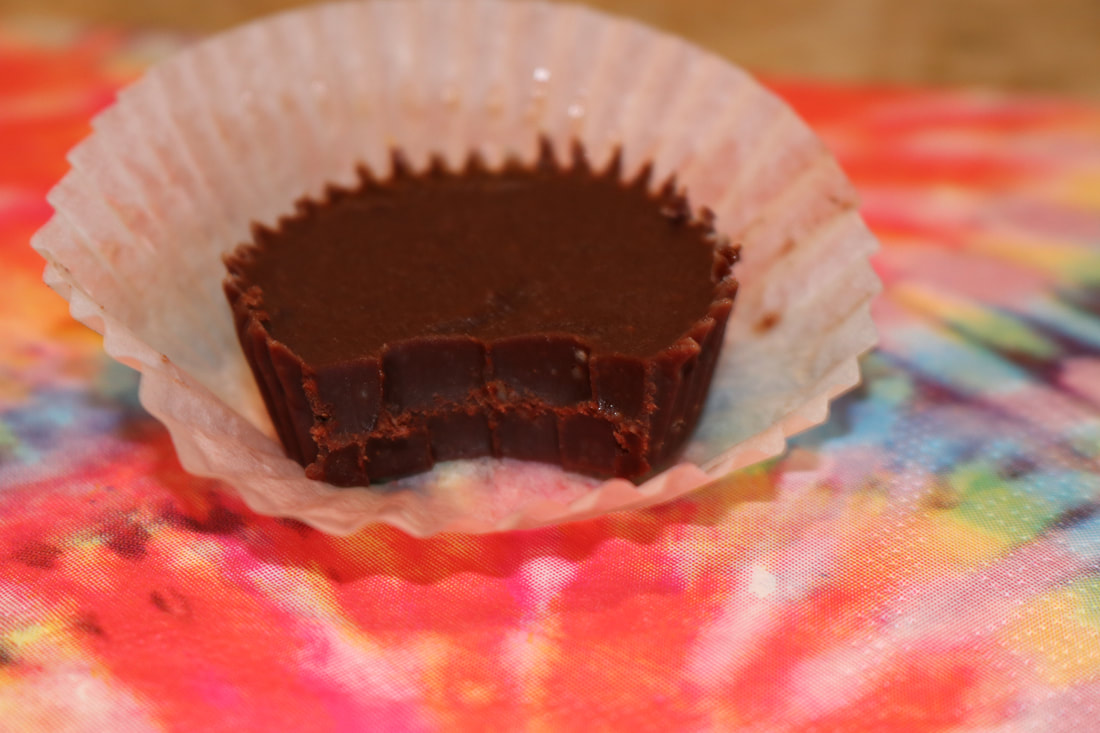
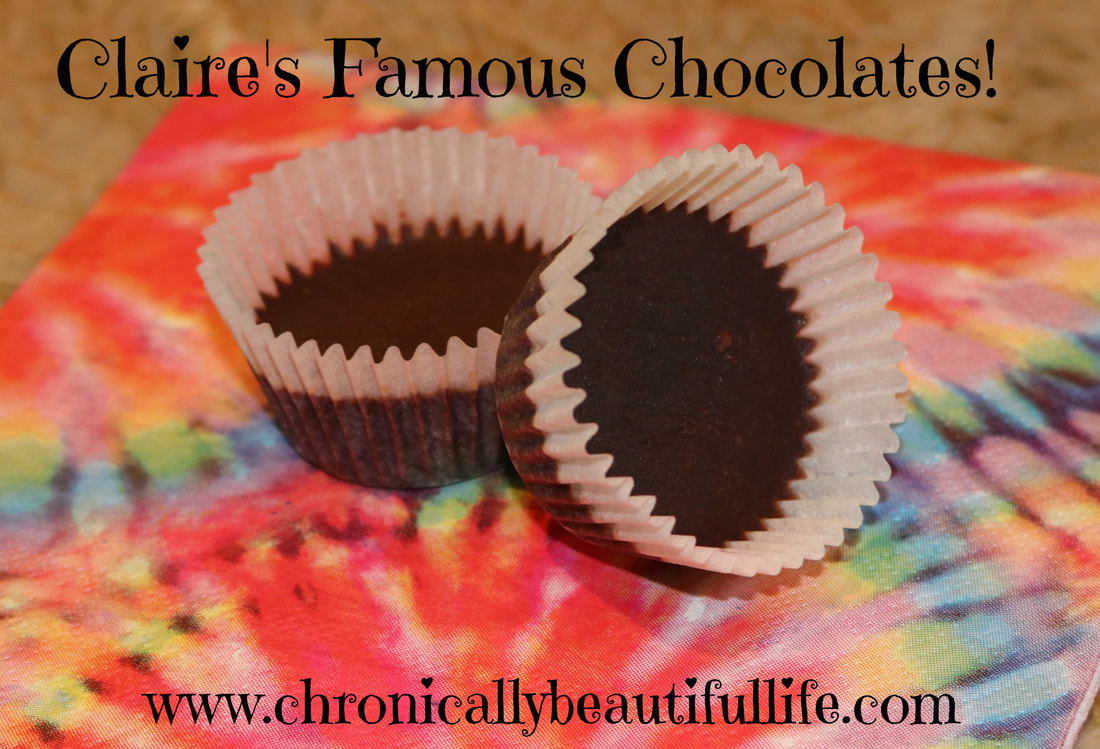
Funny Story about these babies: I once had a couple of friends of mine try these chocolates that I make fairly regularly, and they told me that they were so good that if I wanted to make a man fall in love with me, all I'd have to do is feed him one of these! .... I have to admit, I tried that tactic soon after that visit with those friends, and needless to say... it didn't work! Ha! 😂😁👍

So unfortunately I can't say that these chocolate will find you true love! 😂 But I can say that they are delicious, healthy, and something that my family almost always has in our fridge to snack on.  Not only that, but they only take five ingredients and they're super quick and easy to make large batches all at once!  

There is one thing that I LOVE that was incredibly difficult for me to give up when I went on a diet to manage my Lyme disease, and that one thing is chocolate!  I wouldn't call myself a "chocoholic" anymore, but I am still a lover of chocolate and the good news is that these chocolates are paleo, vegan, and refined sugar-free friendly!  They're packed with healthy fats and they always satisfy your sweet tooth!  This particular recipe is also fun to play with.  The ones in the pictures are just plain chocolate, but you can spice these babies up with whatever whole food you may be craving.  I usually top mine with coconut and almonds, but you could also flavor these with peppermint oil, or raspberry filling made with coconut butter.  Whatever you enjoy, I encourage you to be creative and as always, bake with love! ❤😊

Claire's Famous Chocolates!
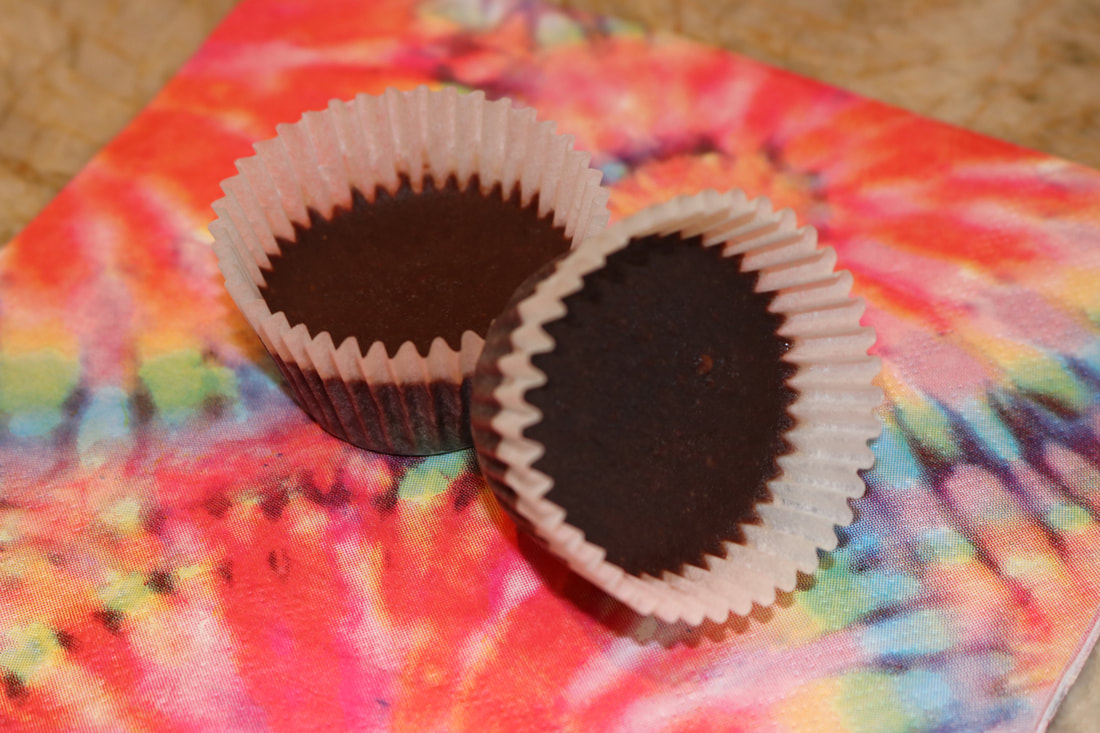
Picture
Ingredients:
1/2 cup coconut oil
1/2 cup organic, high quality cocoa powder
1/2 cup smooth almond butter
1/2 cup raw honey or organic maple syrup (I usually prefer honey)
1 tsp. vanilla extract

Directions:
  • Line a 24 cup mini sized muffin tin with paper liners. 
  • Add the coconut oil, honey, almond butter, and vanilla into a small saucepan.  Heat on medium heat, stirring constantly, until it's smooth and well combined. 
  • Sift cocoa powder into mixture and stir until well combine. 
  • Stirring constantly, bring it to a boil and then remove from heat immediately.
  • Let sit for 5-10 minutes to give it a chance to cool a little.  
  • Spoon mixture into mini muffin cups. (About 1 Tablespoon per cup)
  • Top with whatever you'd like and refrigerate until solid.
*Store in refrigerator.
Picture
Picture
3 Comments

Orange Cream Cake

4/30/2018

0 Comments

 
Picture
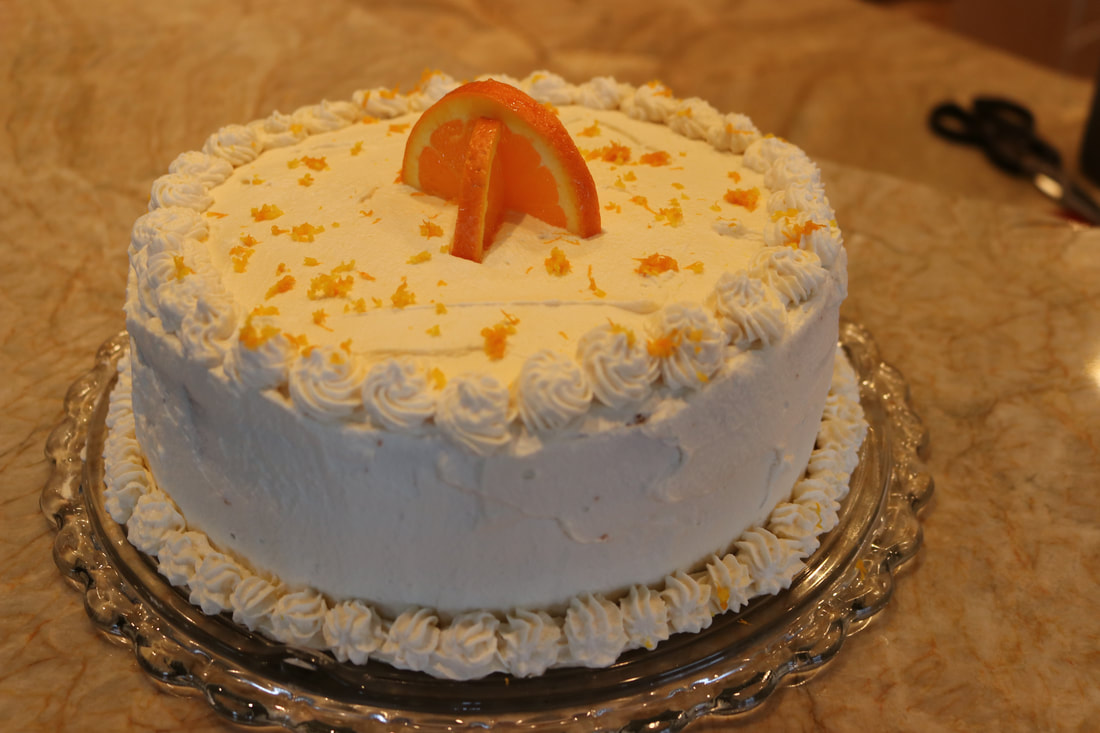
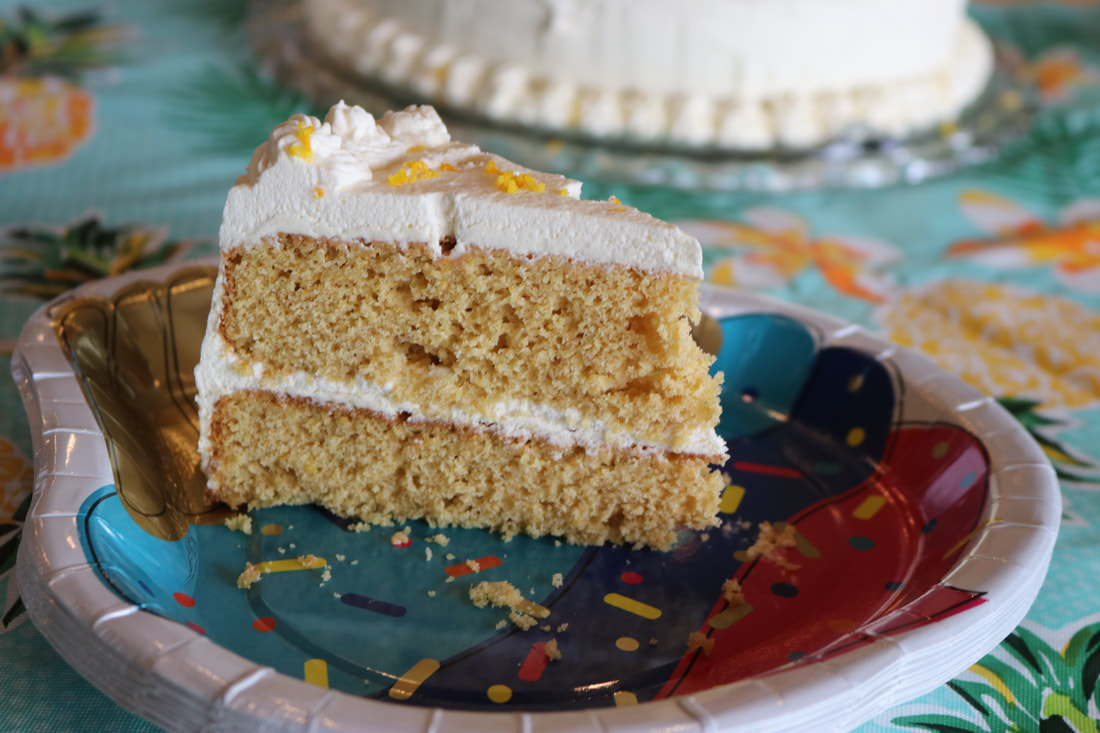
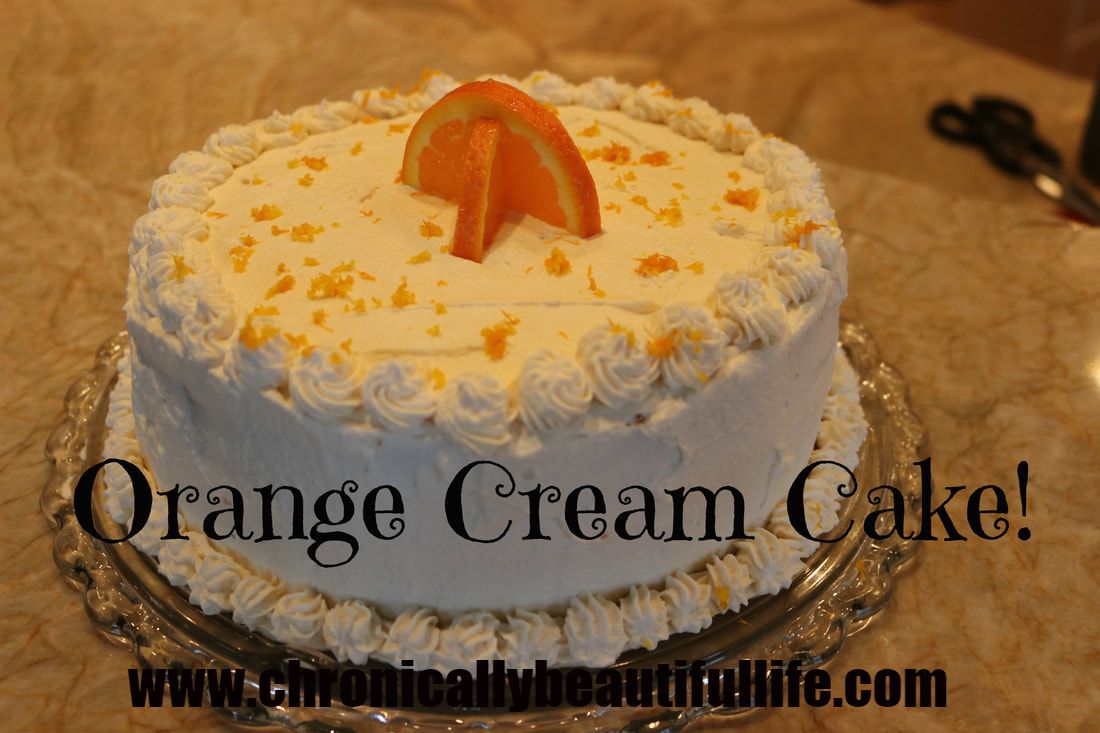
This week was my mother's birthday, and so I needed a good birthday cake recipe!  So, the orange cream cake was born!! :D

My mom has been a Lyme warrior practically her entire life, and we have fought the Lyme battle side by side for many years now.  My mother is a beautiful and incredible woman, and so I wanted a cake that was just as beautiful and amazing as her!
Picture
Picture
Picture
This cake is easy to make, refined sugar free, and made with whole wheat flour!  It just the perfect taste of orange and is absolutely beautiful and perfect for any special occasion! 

Orange Cream Cake

Picture
Cake:
1/3 Cup butter
1/3 Cup palm shortening
2 tsp (or about one orange's worth) grated orange rind
3/4 Cup golden Monk Fruit sweetener
1/2 Cup raw honey
3 eggs
2 1/2 Cups whole wheat bread flour
2 1/2 tsp. baking powder
1 tsp. salt
1 Cup fresh squeezed orange juice 
1 tsp organic orange flavoring (or 2-4 drops of orange essential oil)
Frosting:
1 Cup heavy whipping cream
1/4 Cup organic maple syrup (or more depending on desired sweetness)
1 Tbs. vanilla extract
2 tsp. organic orange flavoring
orange zest and orange slices (optional for decoration)
Directions
  1. Cream together butter, palm shortening, and orange rind.
  2. Gradually add sweeteners until well combined and fluffy.
  3. Add eggs, one at a time, beating well after each addition.
  4. Continue beating for about three minutes or until light and fluffy.
  5. Mix together dry ingredients and then add alternately with orange juice to creamed mixture.
  6. Add orange flavoring or orange essential oil.
  7. Beat until combined.
  8. Line two 8 inch round pans with parchment paper and grease sides with grass-fed butter.
  9. Pour batter evenly in pans and bake at 350° for 25-30 mins or until toothpick inserted into middle comes out clean.
  10. Cool for 20 mins and then remove from pans.
  11. Let cool COMPLETELY before frosting!
  12. For frosting whip all ingredients together until stiff peaks form.
  13. Frost with orange cream frosting to your desired look and top with orange slices and orange zest if desired.
  14. Store in refrigerator.
Picture
Picture
0 Comments

Raw Mint Chocolate Pie

3/22/2018

0 Comments

 
Picture
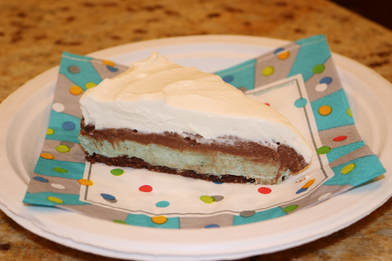
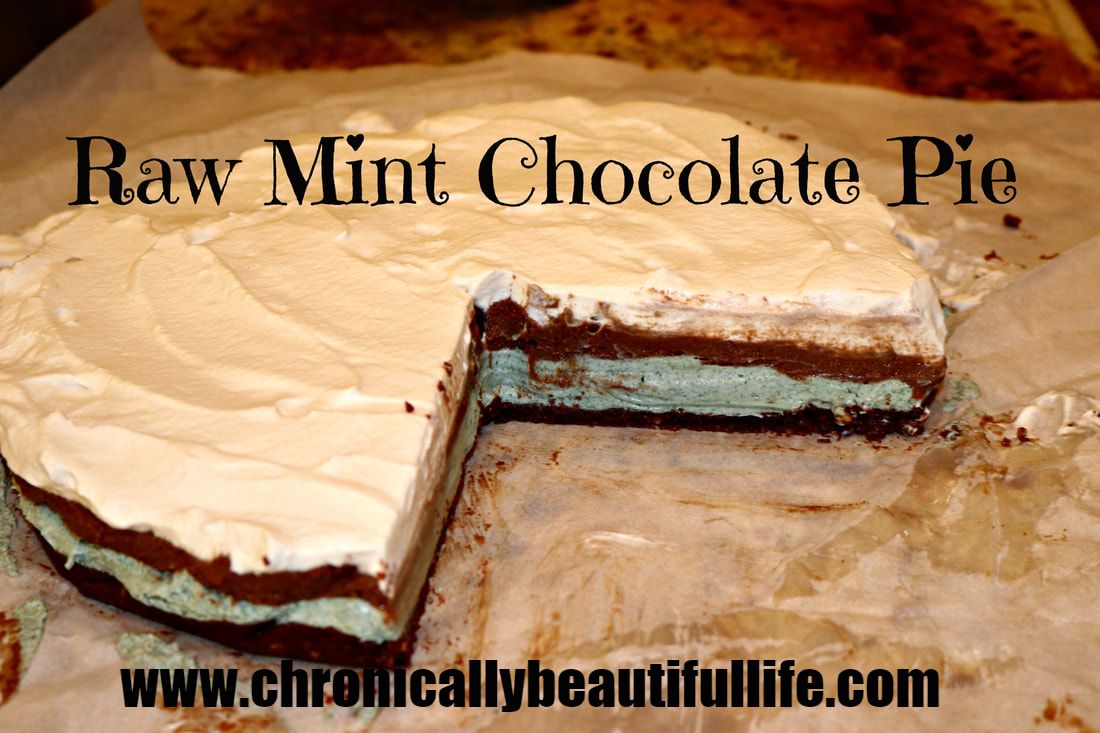
I know the word "raw" never really sounds that tasteful when you're talking about food, but I'm here to tell you that raw food is amazing mainly because it's chock-full of nutrients that don't get extracted from your food due to high levels of heat!  This pie is made from all whole ingredients, and it doesn't include any harmful dyes, refined sugars, or additives.  The green color comes from spirulina (which is a super food), and the chocolate pudding laying is made from scratch, doesn't come from a box, and doesn't have any ingredients with long names that are impossible to pronounce!  On top of all of that, it taste's amazing!

Raw Mint Chocolate Pie
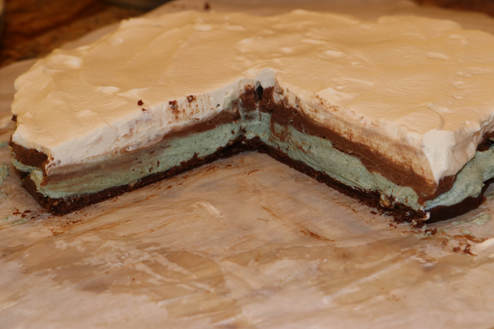
Picture
Crust:
  • 1/2 Cup almonds
  • 1 Cup walnuts
  • 3 large dates
  • 2 Tbs. butter, melted (organic, & grass-fed)
  • 3 Tbs. cocoa powder
  • 1/2 tsp. vanilla extract
Directions:
  1. Add all ingredients to food processor and blend together until crumbly & completely blended together.  Mixture should be kind of dry, but wet enough to stick together.
  2. Press crust mixture into the bottom on a 9 inch pan, lined with parchment paper.
  3. Refrigerate.
Mint Layer:
  • 8 oz. package cream cheese (room temperature)
  • 2 Tbs. raw honey
  • 1/2 cup Heavy Whipping Cream
  • 1/4 cup organic maple syrup
  • 1/2 tsp vanilla extract
  • 2 tsp. mint extract
  • 1/2 tsp. spirulina powder
Directions:
  1. Beat cream cheese and honey in a large bowl until smooth.  Set aside.
  2. In a medium bowl beat heavy whipping cream, maple syrup, and vanilla until light, fluffy, and stiff peaks form.
  3. Beat heavy whipping cream mixture into cream cheese mixture until well incorporated, light, and fluffy.
  4. Add mint extract and spirulina powder.  Beat until well incorporated, or until mixture has turned completely green.
  5. Spread mixture on crust.
  6. Refrigerate.
Chocolate Layer:
  • 1/4 Cup coconut oil (melted)
  • 1/3 Cup raw honey 
  • 1 1/2 tsp. vanilla extract
  • 1/3 cup cocoa powder
  • 2 Cans full fat coconut cream
Directions:
  1. Whip all ingredients except coconut cream together in a small bowl until smooth.
  2. Open cans of refrigerated coconut milk.  Scrape cream off the top (do not add the coconut water).  Whip cream until smooth.
  3. Add the first mixture into the coconut cream and beat until well incorporated. 
  4. Spread mixture over mint layer.
  5. Refrigerate.
Whipped Cream Layer:
  • 1 Cup heavy whipping cream
  • 1/2 Cup maple syrup (organic)
  • 2 tsp. vanilla extract
  • 1/2 tsp. spirulina powder (optional: only if you want top layer to be green as well)
Directions:
  1. ​Whip all ingredients together until mixture is light and fluffy, and forms stiff peaks.
  2. Spread on the top of the pie.
  3. Refrigerate pie for 1-2 hours or until it is fully set up.
  4. Top with chopped chocolate, or nuts, or just leave it plain! (It's great either way!)
  5. Cut, serve, and ENJOY! :D
Picture
0 Comments
<<Previous
Forward>>

    Welcome to My Kitchen!

    Picture
    Food is one of the greatest forms of science, art, medicine, and sustenance all at the same time!  It's what feeds our lives and pumps through our blood.  It's what connects us and what gives us energy to fulfill our purpose.  It is for that reason that I have a deep passion for discovering, cooking, and eating only the most nutrient dense foods.  In my kitchen, we only use organic, whole ingredients that feed the body, as well as the mind and soul.  My hope is to inspire healing through healthy  AND delicious food that feeds not only our stomachs, but also our hunger for connection and quality of life.  

    Archives

    March 2022
    July 2021
    October 2019
    July 2019
    June 2019
    April 2019
    March 2019
    February 2019
    January 2019
    December 2018
    November 2018
    October 2018
    August 2018
    July 2018
    June 2018
    April 2018
    March 2018

    Categories

    All
    Bars
    Breads
    Breakfast
    Cakes
    Casseroles
    Chocolate
    Comfort Foods
    Cookies
    Crisps And Cobblers
    Dairy Free
    Dinner
    Fat Bombs
    Gluten Free
    Keto
    Muffins
    Paleo
    Pastries
    Pie
    Raw Food
    Side Dish
    Smoothies
    Snack Food
    Sugar Free Desserts
    Sweet Treats
    Thanksgiving Recipes
    Vegan
    Vegetarian

    RSS Feed

    Picture
    Remember, when we spend our money on the most nutritious and whole ingredients, our dollars become our vote for healthier living, and happier lifestyles. ​
    View my profile on LinkedIn

Blogs

Chronically Beautiful
Chronically Delicious
​Chronically Healthy

Chronically Claire

About
Lyme Disease
Endometriosis

Support

Disclaimer
Contact
© COPYRIGHT 2015. ALL RIGHTS RESERVED.
Picture
Disclaimer: For Educational and Informational Purposes Only.  The information provided by Chronically Beautiful is for educational and informational purposes only, and is made available to you as self-help tools for your own use.  All and any information given on my website is for the purpose of sharing information to help you help yourself, and not for me to take on any other role as any health professional.
  • Home
  • Chronically Beautiful Blogs
    • Chronically Beautiful
    • Chronically Delicious
    • Chronically Healthy
  • About
  • The Chronically Care Project
    • Adult Care Package Application
    • Kids Care Package Application
  • Published Articles & Podcasts
  • Contact
  • Disclaimer